


3 Ways in Photoshop to Remove Background for Newbies
In daily lives, we may be confronted with some tasks that require us to get a picture without background, and most of the time, Photoshop is the first program that comes to our mind.
In this step-by-step tutorial, we will show you with visual aids three ways that Photoshop removes background from an image: Background Eraser Tool, Select Tool and Pen Tool. If you still feel that it consumes too much time and energy to remove background in Photoshop, we also introduce to you a professional alternative – AnyErase, which is far easier-to-use and boasts the high precision outcome. Let’s get started.
Part 1. How Does Photoshop Remove Background of Image
There are many approaches to removing background in Photoshop, and in this page, we will introduce three of them to you. You can directly remove background color with Photoshop Background Eraser Tool, select the background area with Select Tools and take away background, or you can use Pen Tool to draw the outline of an object and get rid of background in Photoshop. Go ahead for the detailed steps.
Background Eraser Tool
Background Eraser Tool may be the most easy-to-use tool to remove background in Photoshop. It is a kind of brush tool. You just need to draw an area with the brush and the colors of that area will be erased. Let’s go ahead to read the detailed Photoshop background removal steps.
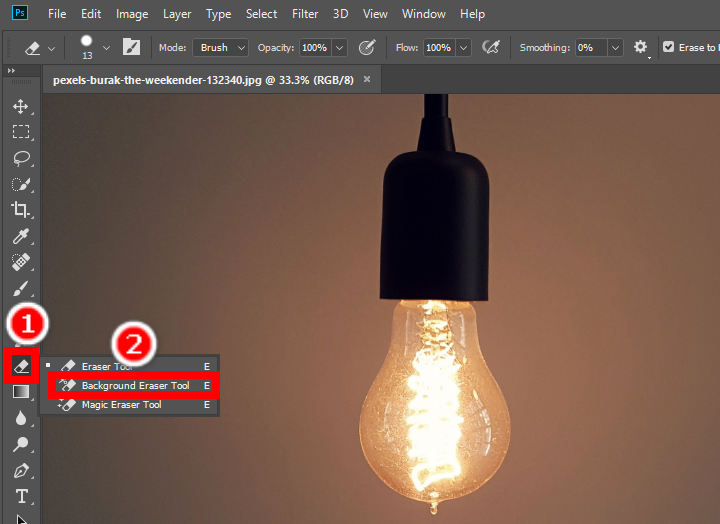
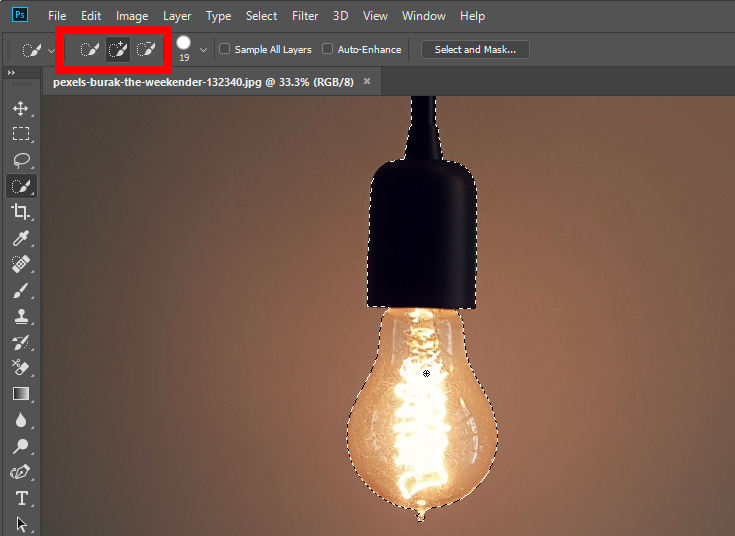
- Step 1. Launch your Photoshop and open a picture. Then, go to the tools bar on the left, right-click on the Eraser Tool (an eraser icon) and choose Background Eraser Tool. You will see your pointer turn into a brush (a circle with crosshairs inside).
- Step 2. Then, hold down your click and move the brush around the background areas to remove background color in Photoshop. Photoshop Background Eraser Tool will render those areas transparent. You can alter the Size, Hardness, Spacing and modes of Limits of your brush on the upper panel.
Repeat the action till you totally get rid of background in Photoshop.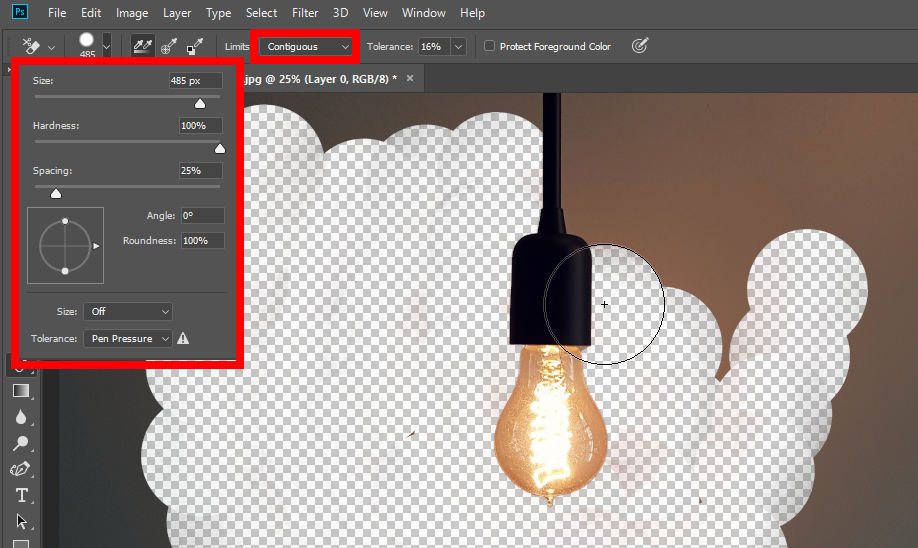
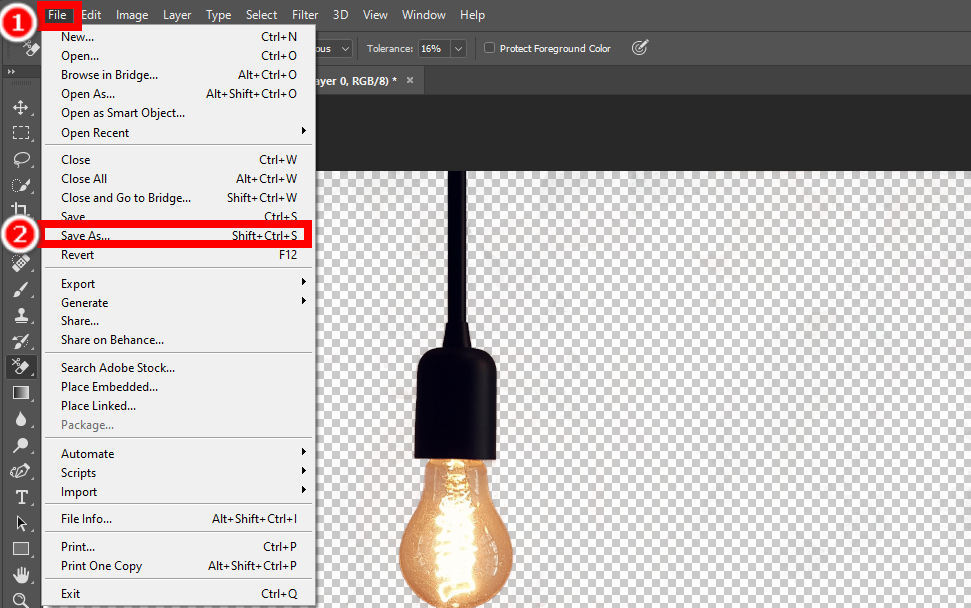
- Step 3. When you are finished, click File > Save As to save your result. Note that you should save it as PNG file for only this format supports transparent background.
Tips on Limits Mode
On the upper panel are three modes of Limits: Contiguous, Discontiguous and Find Edges. Discontiguous mode removes colors wherever your eraser brush covers. Contiguous mode detects the color around the crosshairs and remove the connected colors (similar colors). Find Edges mode tries to pick out edges of the object and keep the object untouched.
Select Tool
Photoshop provides you with several Select Tools that can make a selection of the object. Here we are going to tell you to select an area with two most popular ones: Quick Selection or Lasso Tool. Then, use Select and Mask to remove background color in Photoshop. We will talk about how to select the object first.
1. Quick Selection Tool
Quick Selection Tool can smartly select an area with similar colors and thus is often used to make a selection of an object with clear edges. Steps are as follow:
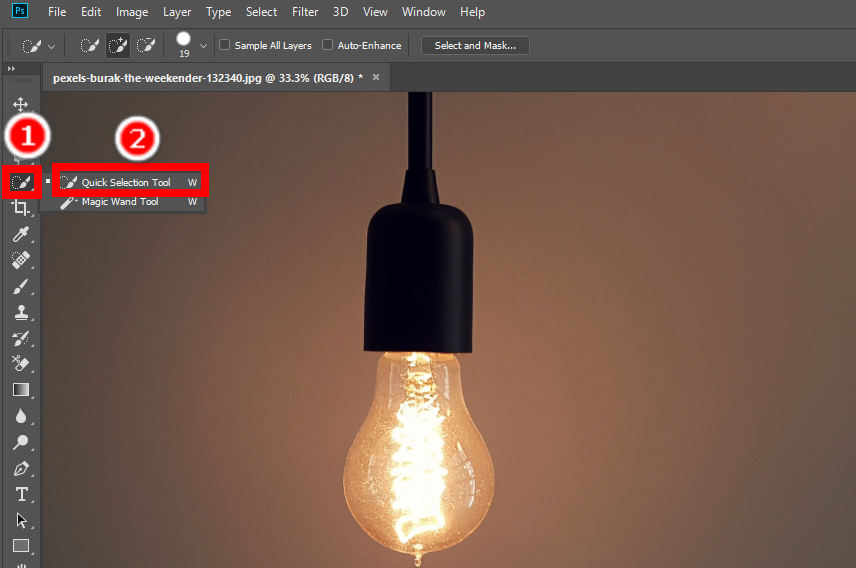
- Step 1. First, you should choose Quick Selection Tool. It’s the fourth tool from the top on the left tools bar. If the fourth tool is Magic Wand, right-click on it and choose Quick Selection Tool on the pop-up menu.
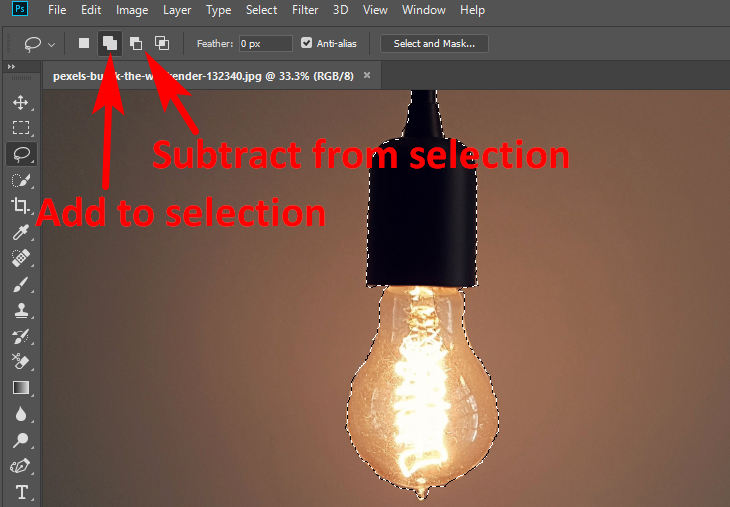
- Step 2. Second, move your pointer over the object while pressing the left mousepad, and Photoshop will automatically select the object. If you are unsatisfied with the auto selection, you can edit it with the Add to selection or the Subtract from selection tool on the upper panel.
2. Lasso Tool
Lasso Tool allows you to draw the outline of an object freely and is thus used to make a more precise selection. Next are the steps:
- Step 1. Click to use the Lasso Tool, the third tool on the left tools bar. If you don’t find it, right-click on the third icon on the tools bar and select Lasso Tool on the menu.
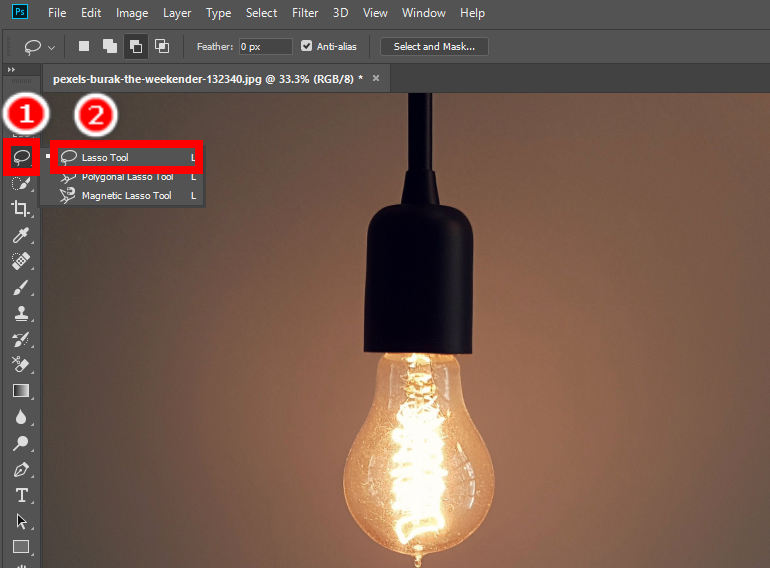
- Step 2. Then, you should draw the outline of the object carefully with your mouse. On the upper panel are two tools you can use to Add to selection or Subtract from selection to refine the selected area. Draw the outline as carefully as possible in order to get the best Photoshop background removal effect.
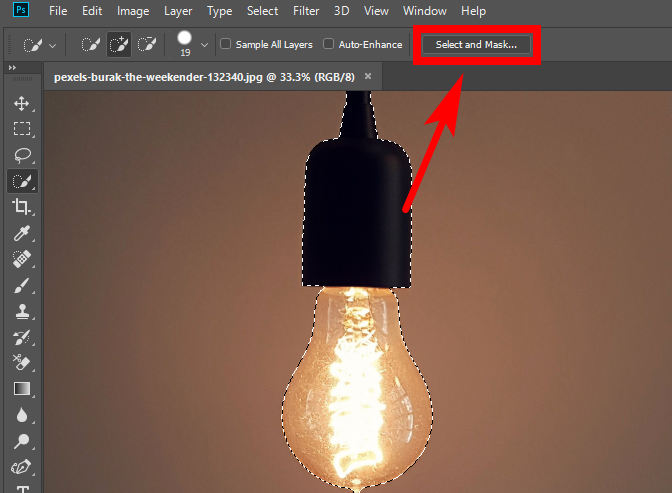
OK, now you have handled the two selection tools and perfectly made a selection of the object. Now, it’s time to get rid of background in Photoshop with Select and Mask function. It’s fast and easy and you just need few clicks to remove background from image in Photoshop. Let’s go next.
- Step 1. With the object perfectly selected, hit Select and Mask option on the upper panel.
- Step 2. On the Select and Mask window, you can alter the features of the result image here. Once you alter the result to a suitable state, choose Output To > New Layer.

- Step 3. Click on File > Save As to save the result in your device.
Pen Tool
Pen Tool is often used to mark the outline of an object or something, and therefore, is also a good tool by which can Photoshop remove background from an image precisely. It utilizes anchor points to trace an object accurately.
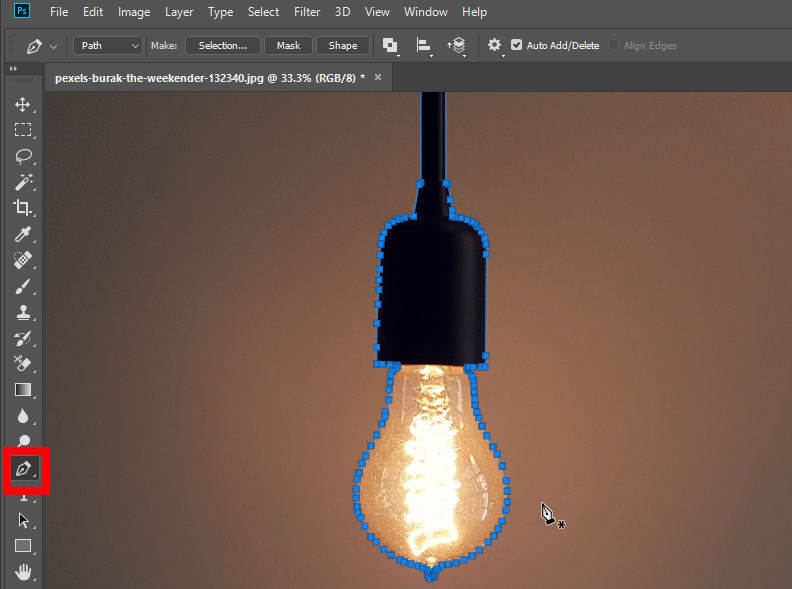
- Step 1. First, click to choose pen tool (a pen icon) on the left tools bar. Then, start to mark the outline of object. Click on a point to place an anchor point here, then, place another anchor point and Photoshop will draw a line from that point to the previous one. Put anchor points around the edges of an object to mark its outline. The convoluted edges require more lines, and thus more anchor points.
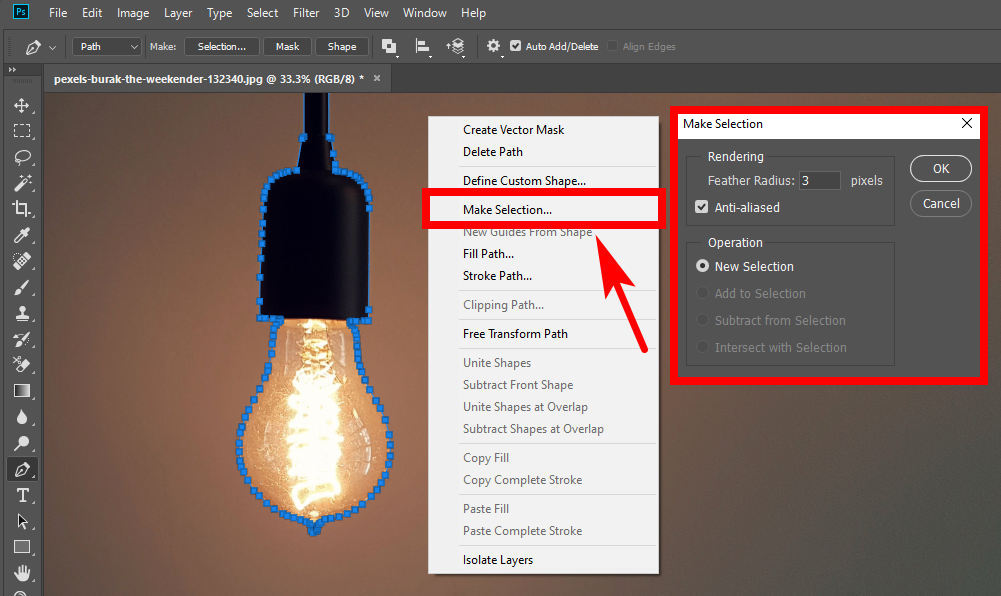
- Step 2. Now, right click on the picture. A pop-up menu will appear, and then, choose Make Selection. You can alter the rendering effect of the selection in a pop-up window, and hit OK to save the selection.
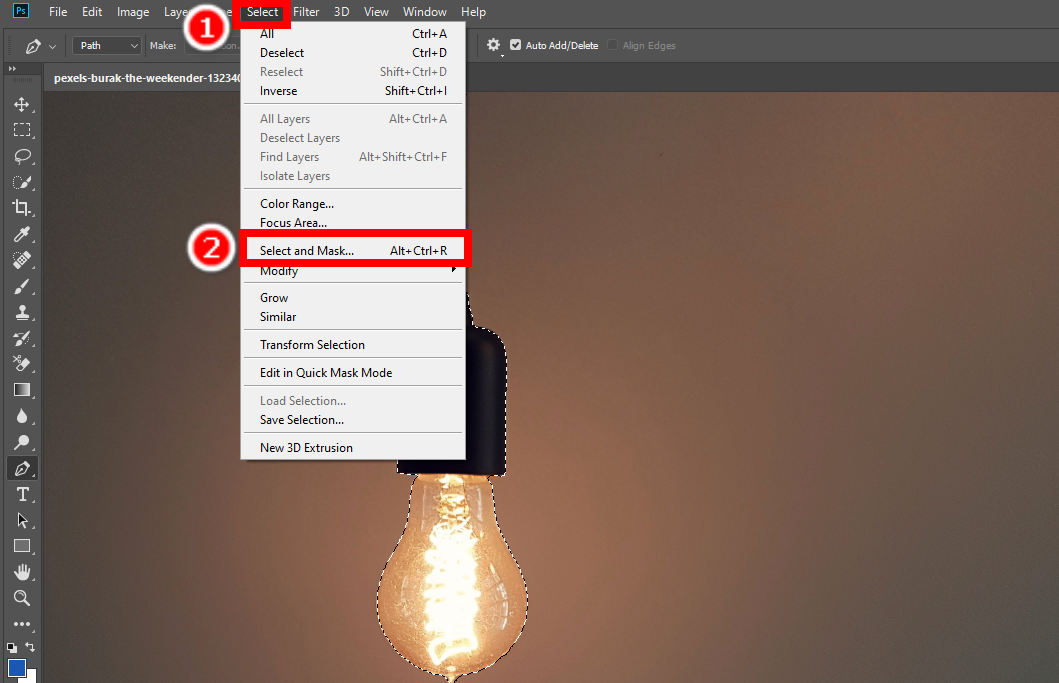
- Step 3. Go to the top options bar, and hit Select > Select and Mask.
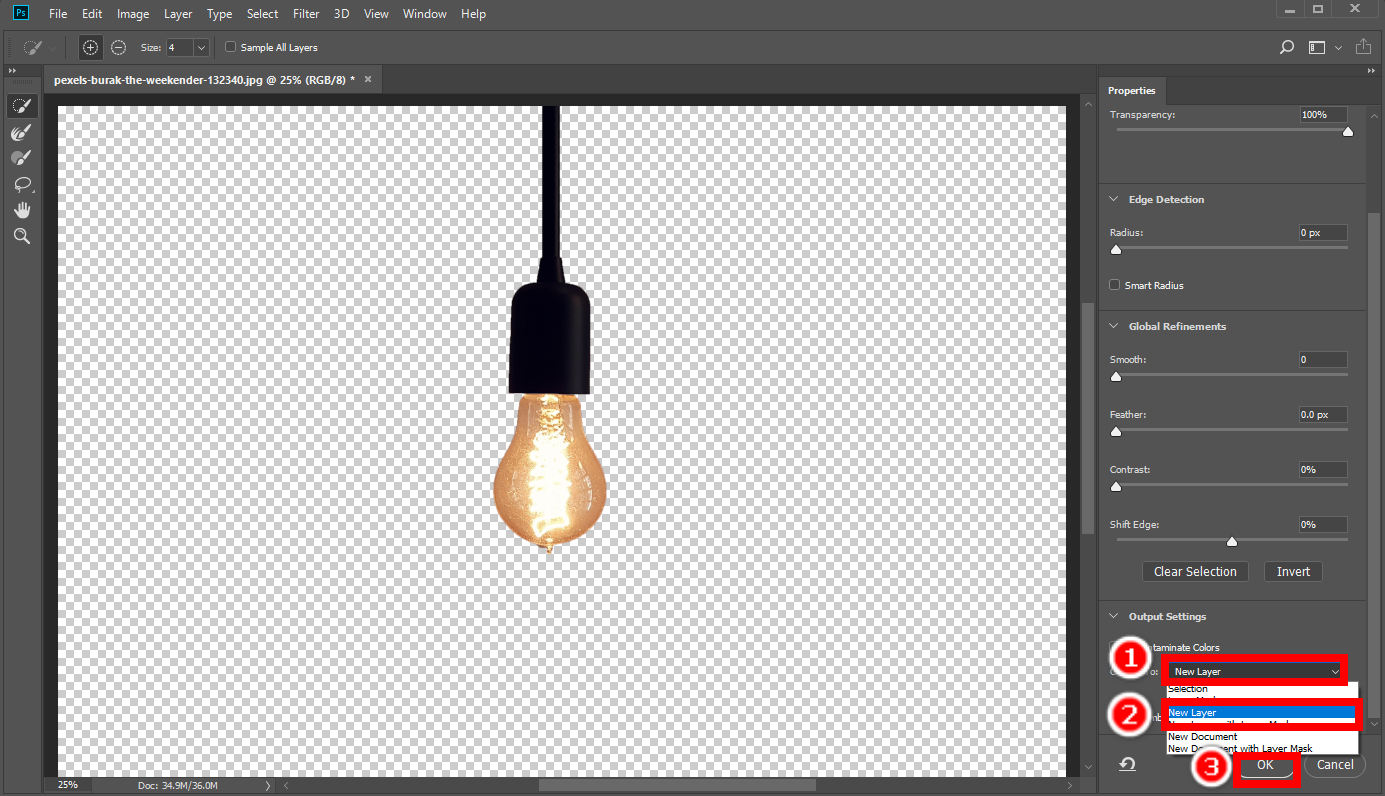
- Step 4. Alter the features of your result image in the Select and Mask window, and next, go to Output To > New Layer to finish the Photoshop background removal procedure. Then, save your image with transparent background by hitting File > Save As.
Part 2. Remove Background with an Easy-to-Use Alternative – AnyErase
On the above page, we have shown you how to remove background in Photoshop in three ways. However, it costs you relatively much time and energy to get an accurate Photoshop background removal result. Is there any alternative tool that can remove background from an image quickly and accurately?
The answer is yes. AnyErase is a powerful and professional background remover that allows you to erase image background in just one click. You can also further modify the background such as changing background color or adding a new background. Move on to read how to use this powerful program.
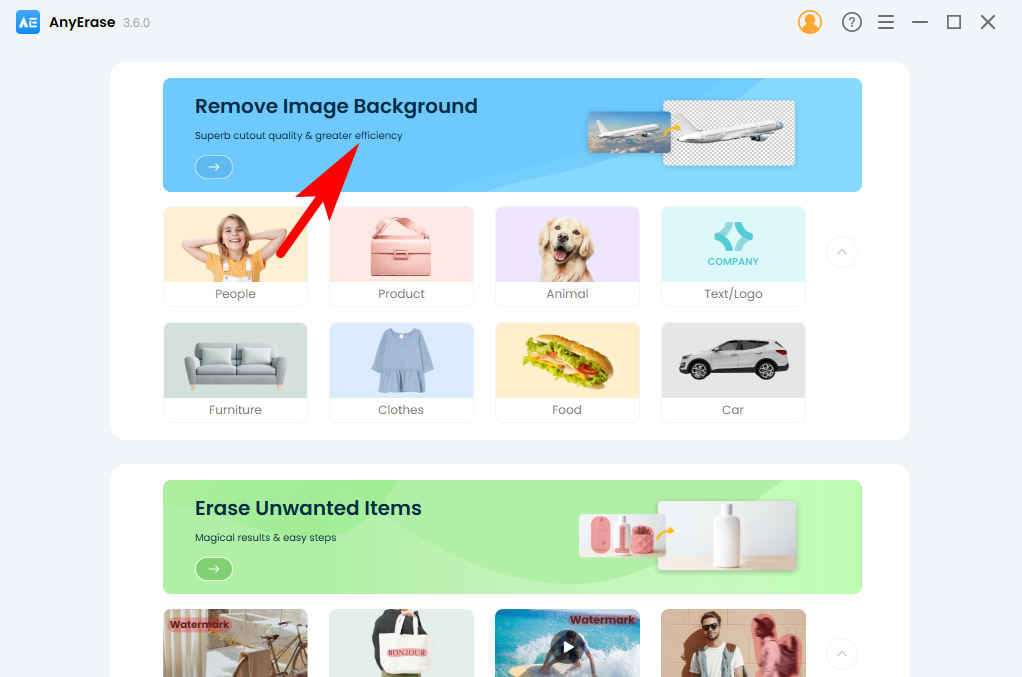
- Step 1. First, launch AnyErase and you will see a window as is shown below. Then, Hit Remove Image Background. You can choose the specific cutout mode according to the kind of your image, enjoying a flawless result.
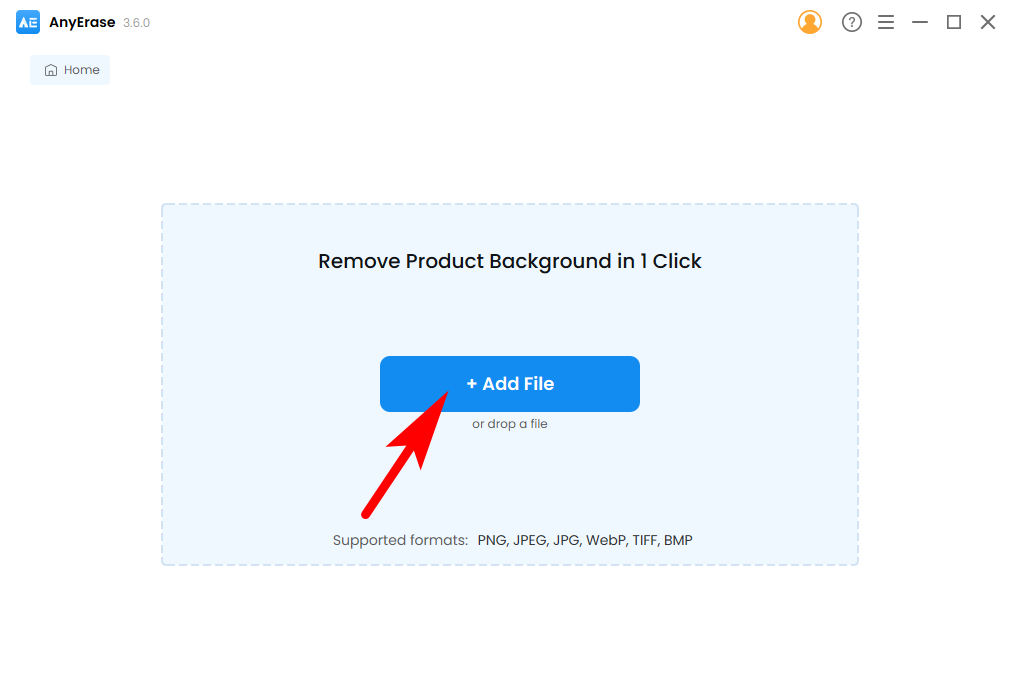
- Step 2. Second, hit + Add File to pick a photo from your device. Alternatively, you can drag and drop a photo here. It supports the formats of PNG, JPEG, JPG, WebP, TIFF and BMP.
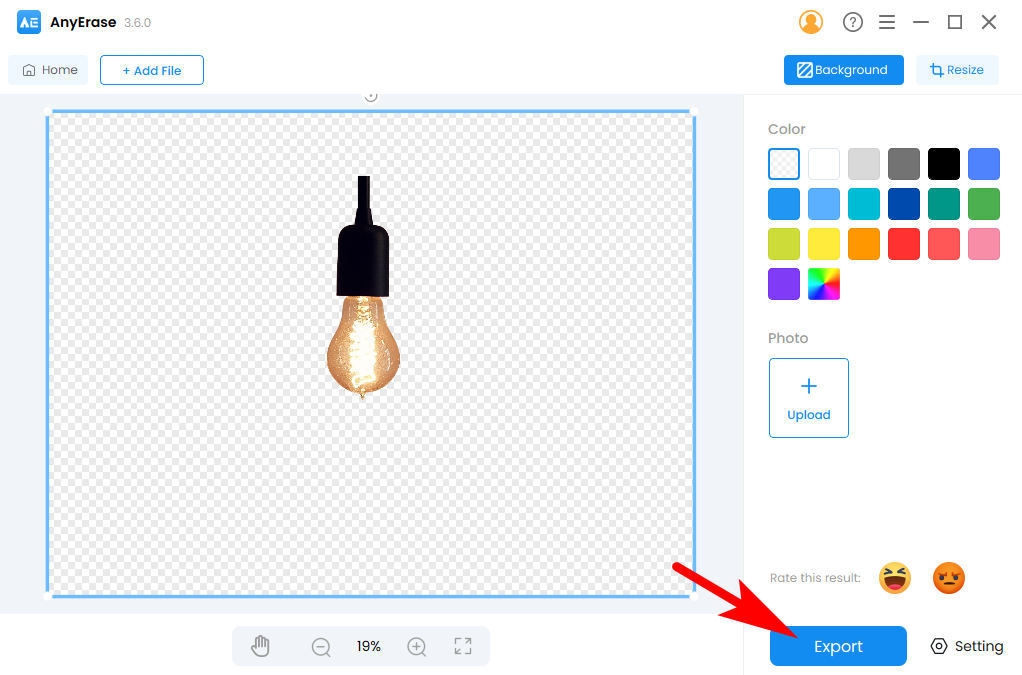
- Step 3. Finally, the background has been perfectly removed from your picture, and click on Export to save the HD output in your device. You can do further modifications on the right panel, like adding a background color or a new background.
Conclusion
This page is a step-by-step Photoshop background removal tutorial with visual aids and we mainly introduce to you three ways that Photoshop remove background from an image precisely. The next time you have to take away image background, just go launch Photoshop and make use of the three powerful tools – Background Eraser Tool, Select Tool and Pen Tool – to do the job.
We also highly recommend you to try AnyErase. It’s a professional background remover that removes background from image in 1 click. It boasts high precision, fast speed and HD quality result. Click download button below to install this useful program to your device.
Hope you get help from this page!
Secure Download
FAQs
1. How to remove background in Photoshop with object selection tool?
There are several select tools in Photoshop. You can use Lasso Tool to directly trace out the outline of an object, or move your mouse over the object with Quick Selection Tool to let Photoshop select the object automatically. There will be two tools on the upper left panel that allows you to add an area to or subtract an area from the selection. Once you are done with the selection, hit Select and Mask on the upper pane, choose New Layer in Output To option, and save your result.
2. How to easily remove background in Photoshop?
You can use Background Eraser Tool to directly remove background. It is the third tool from the top in the tools bar and easy to understand. Just hold on clicking and move your mouse over the background, and the eraser will eliminate any pixel in that area.