How to Insert Signature in Word on Mac in Just 1 Minute
With the trend of businesses going digital and teams working remotely, signing a document in Word has become a necessity. And the best way to go is by inserting a handwritten signature.
Actually, adding a signature with a transparent background makes your document trustworthy. But if this is your first time, it could be frustrating and challenging to make a professional signature and insert it in Word on Mac.
Luckily, in this article, we will walk you through the step-by-step process of how to extract signature from image, how to insert signature in Word on Mac, and how to create a reusable signature to help you sign document in Word efficiently.
Let’s dive in!
Step 1. How to Create Handwritten Signature for Word on Mac
Inserting a handwritten signature in Word documents not only adds a uniquely personal touch but also enhances a sense of authenticity and professionalism.
Generally, if you want to sign document in Word using your handwritten signature, you need to create an electronic signature for Word first.
Here are 2 simple ways how to create a signature on MacBook.
Keep reading!
Make Professional Signature in 1 Click
Creating a signature for a World document can be easy and quick.
Here, we recommend an online signature background remover – AnyEraser Digital Signature Generator to make a professional signature for your Word document. Follow the simple steps:
- Step 1. Write your signature on a piece of paper, take a photo of it, and then save the image on your Mac.
- Step 2. Go to AnyEraser E-Signature Maker and upload your signature photo. The online tool will automatically remove the background of your signature image in seconds.

- Step 3. Download the signature in a PNG image.
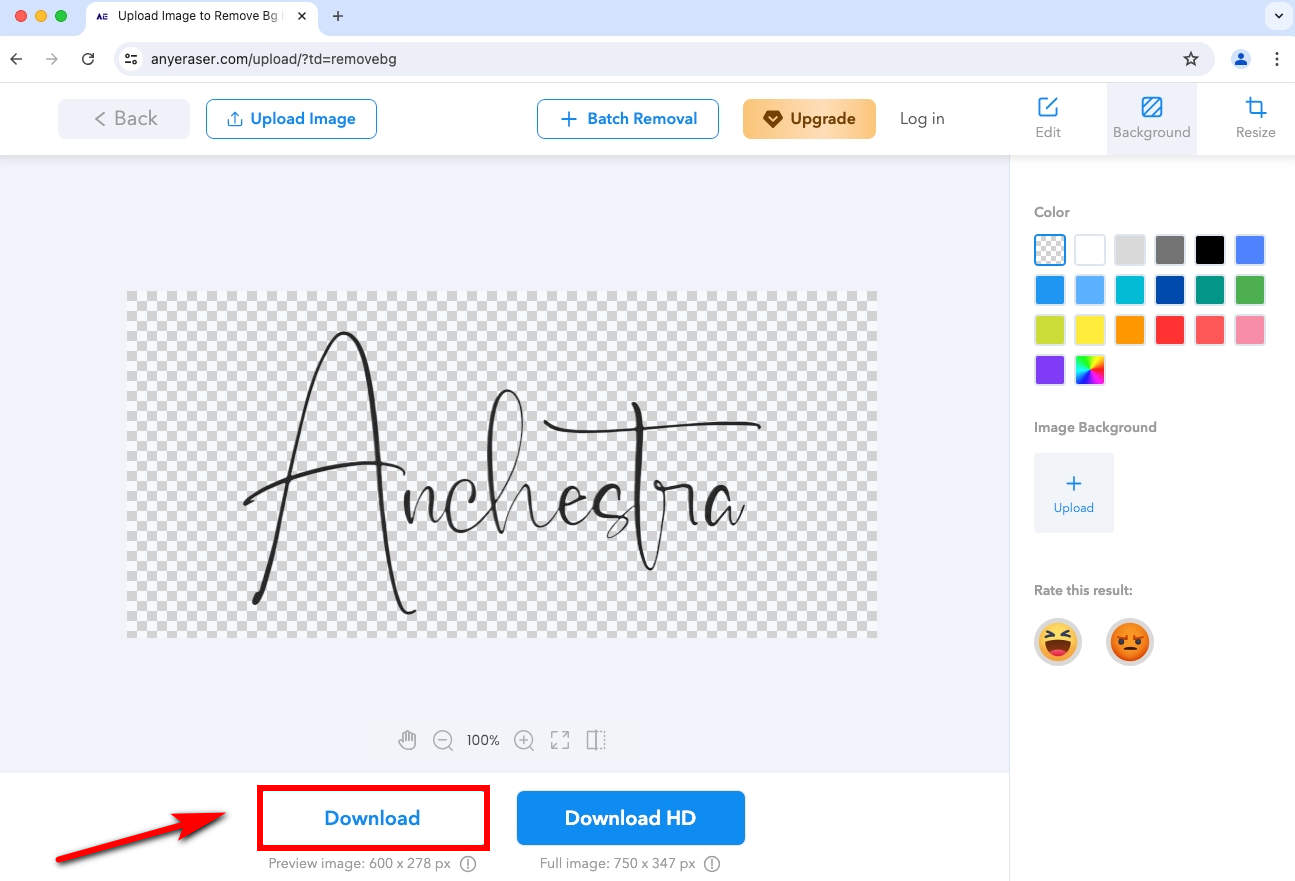
Now you have a professional handwritten signature with a transparent background, and you can effortlessly insert it into Word on Mac.
Create Signature with Mac Built-in App
To create a digital signature, you can use the Preview app, a built-in image viewer that comes with your Mac. After that, it will be simple to add signature to Word document.
Let’s learn how to make an electronic signature using Mac built-in Preview:
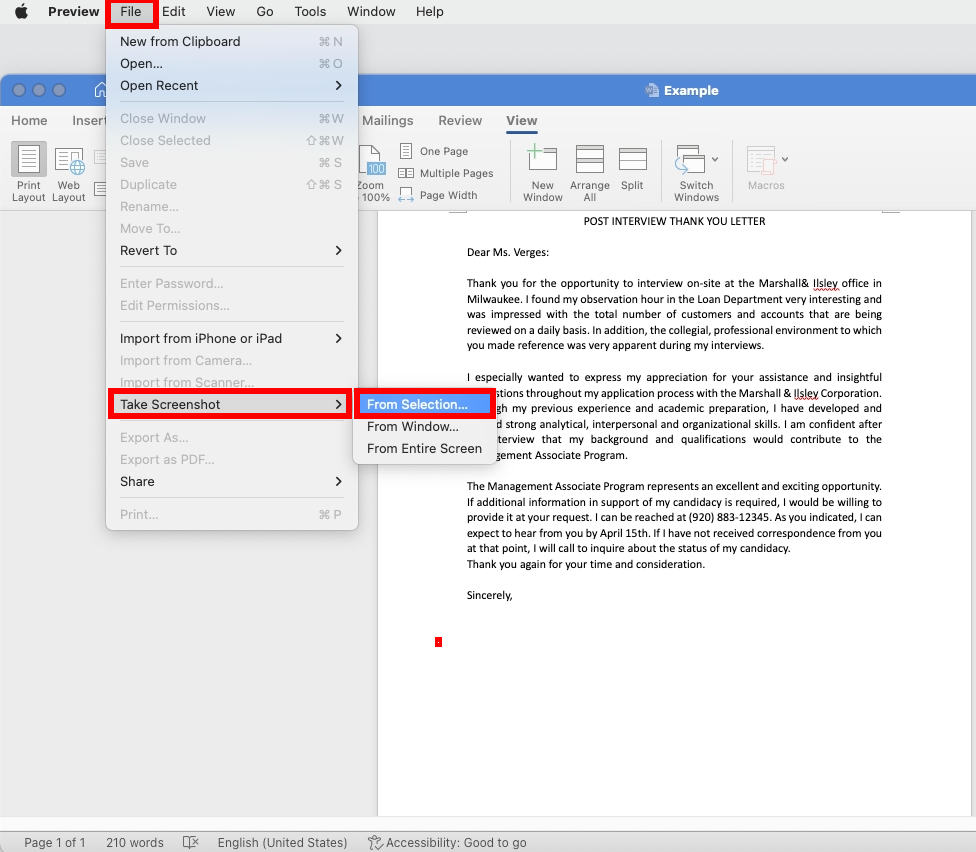
- Step 1. Take a screenshot in advance. Open the Word document and open the Preview app on your Mac. Once the Preview app is launched, click on “File” > “Take Screenshot” > “From Selection…” to take a screenshot of the white area on Word.
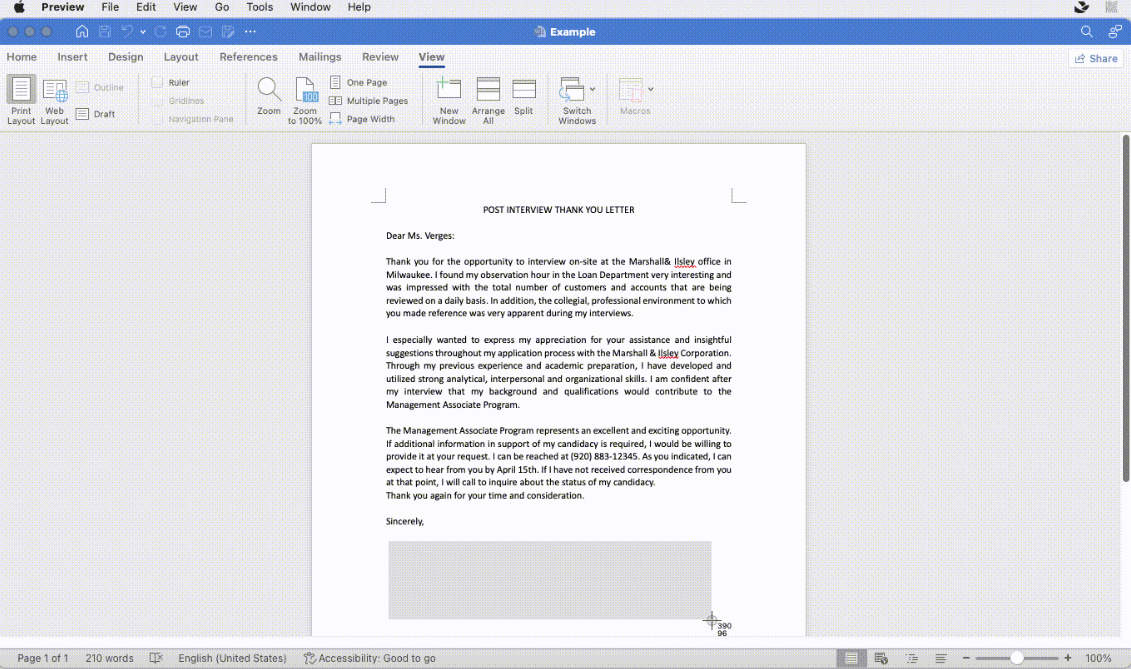
- Then, you can drag your cursor over any white area on Word.
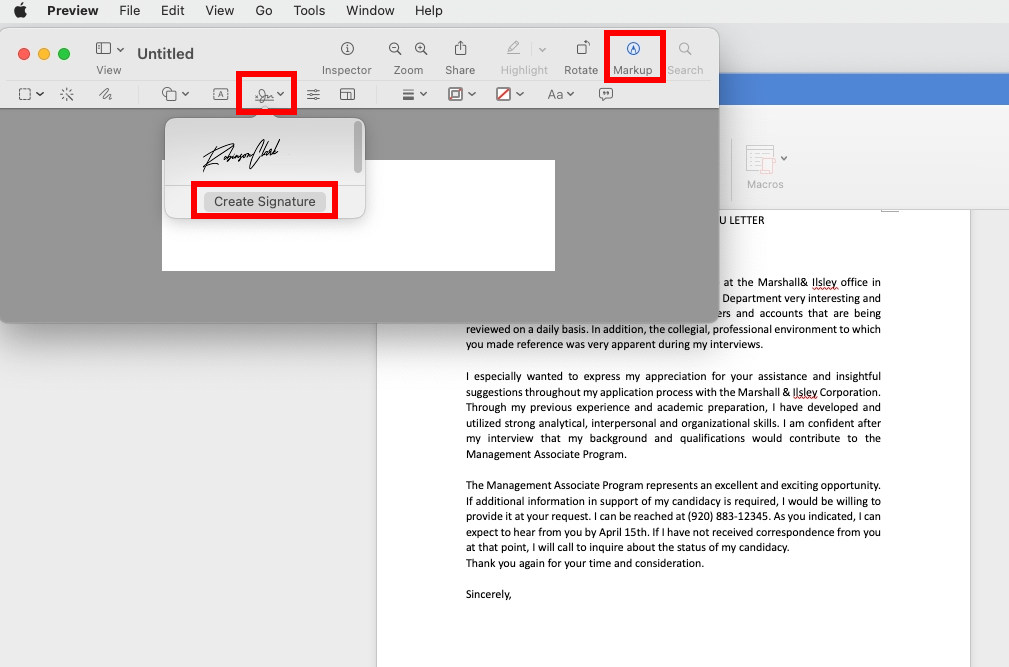
- Step 2. Create a signature. The screenshot will appear in a pop-up window. Select the “Markup” icon > the “Sign” icon > “Create Signature” to make a new signature.
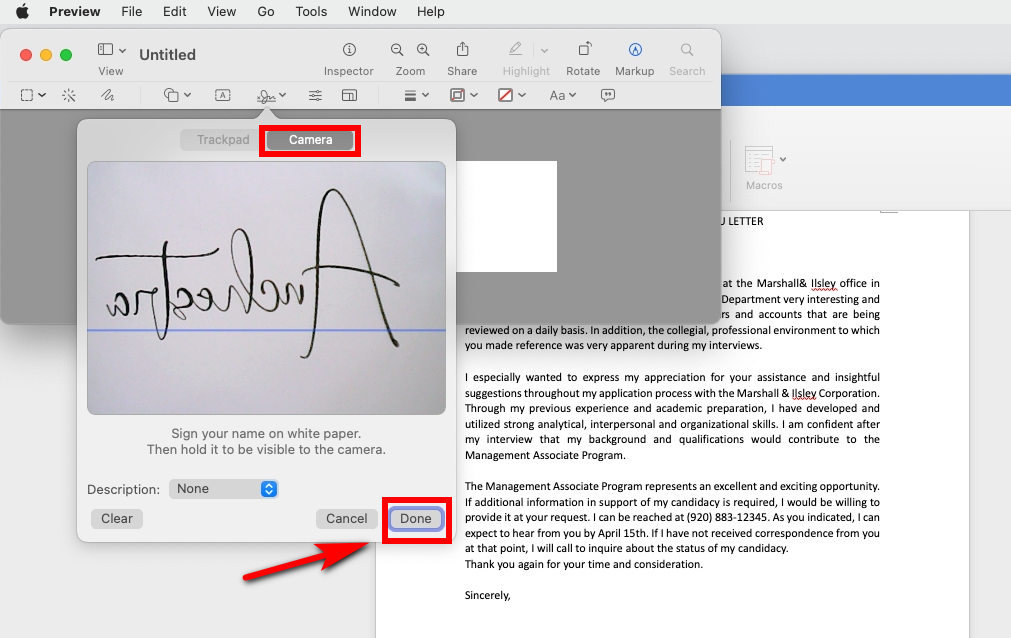
- Step 3. Then, we’ll show you how to create a signature using the camera on your Mac. Hold the paper with your signature in front of the camera. It will automatically recognize your handwritten signature. When the signature appears on the screen, click “Done” to save it in Preview.
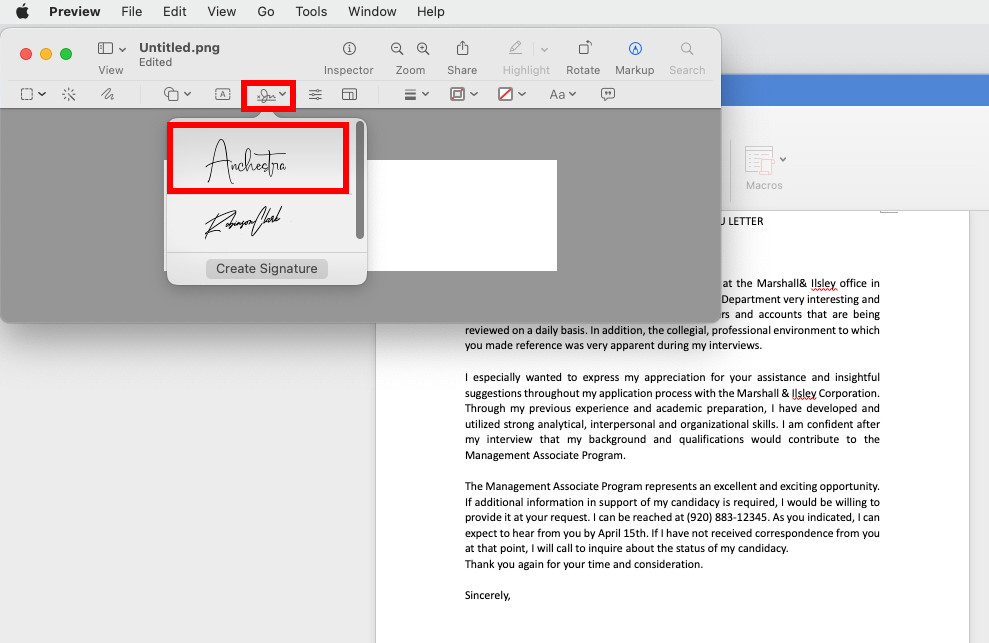
- Step 4. Click the “Sign” icon again and choose the signature you just created from the drop-down.
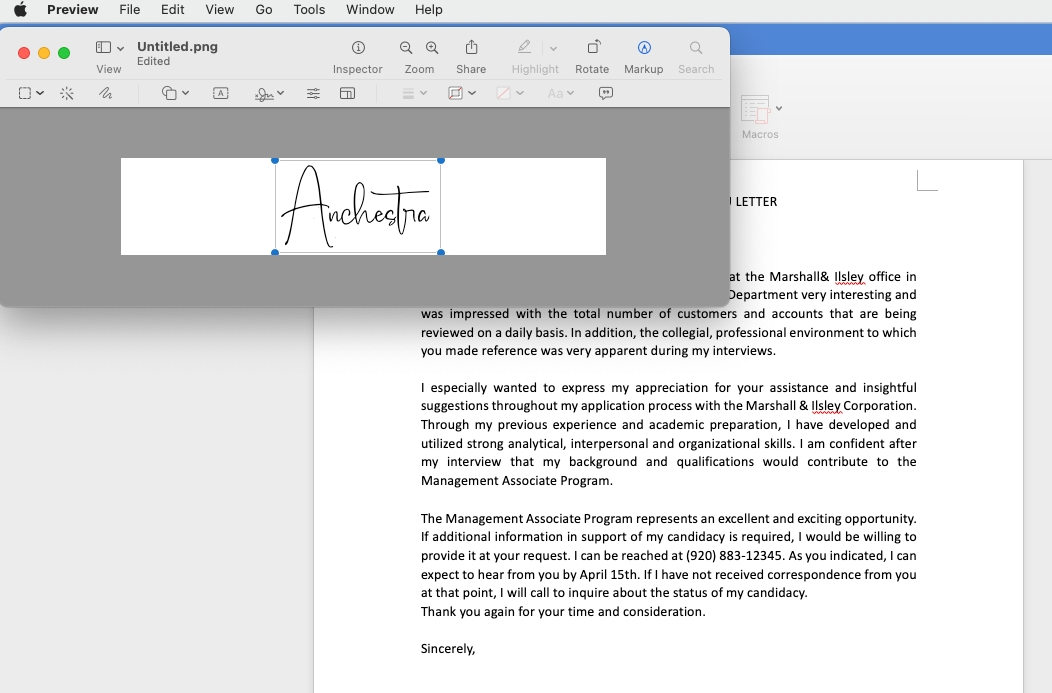
- Step 5. Resize the signature to fill the page.
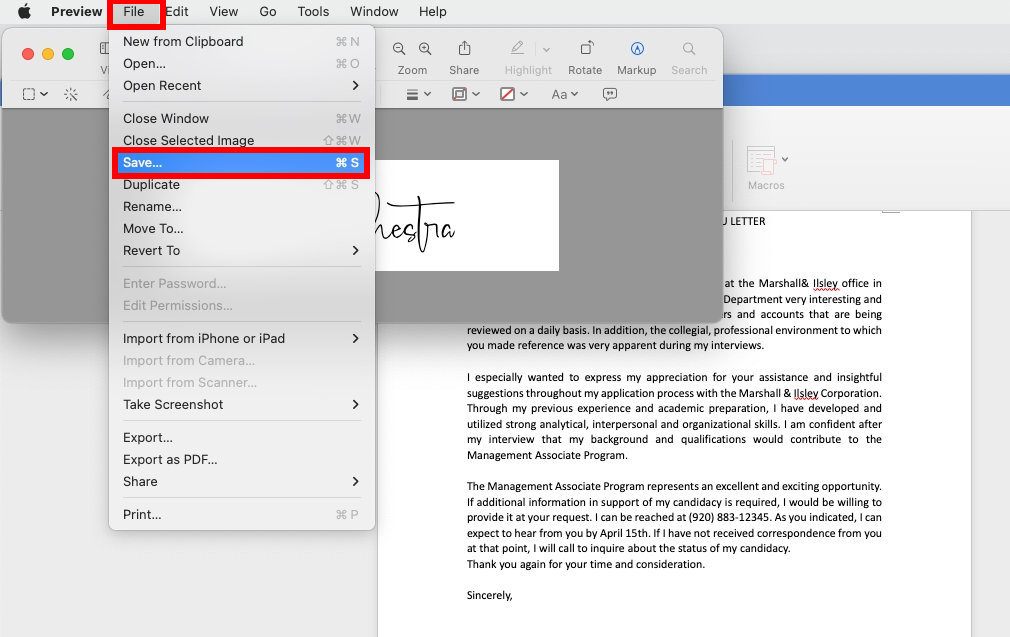
- Step 6. Then, click on “File” > “Save…” to save it in a location you can find easily on your Mac.
Once you have created the electronic signature with Preview app, then you can easily insert signature in Word on Mac.
Tips:
As you hold the paper in front of the camera, the signature will appear reversed, but the digitized version will be correct.
If there are any other markings or irrelevant lines on the paper or if the paper doesn’t fill the screen, the Preview is likely to identify other markings besides the signature, so you need to try it a couple of times to get it right.
Step 2. How to Add Signature in Word on Mac
Now that you have created a digital signature with AnyEraser Digital Signature Generator or Preview on your Mac. Let’s learn how to insert signature in Word on Mac following the simple steps:
- Step 1. Open your Word document and click anywhere you want to insert your electronic signature. Click on “Insert” tab > “Pictures” > “Picture from File….”
- Step 2. Choose your signature image from the local file, then select “Insert,” and your signature will appear at the cursor.
- Step 3. Resize the electronic signature as needed.
- Step 4. Save the file, and you are done.
Bonus. Create Comprehensive Signature to Sign Word Efficiently
If you want a signature to include a handwritten signature, a picture, a job title, a phone number, or an email address, you can use AutoText in Word to complete it. This way, you can get a reusable signature with text to sign any Word document quickly and efficiently.
Above all, let’s look at how to create AutoText blocks with the following steps:
- Step 1. Type the text you want to be included in your signature. For example, your job title, phone number, etc.
- Step 2. Select the text you typed and the signature image together.
- Step 3. Next, click the “Insert” menu, select “AutoText” > “New….”
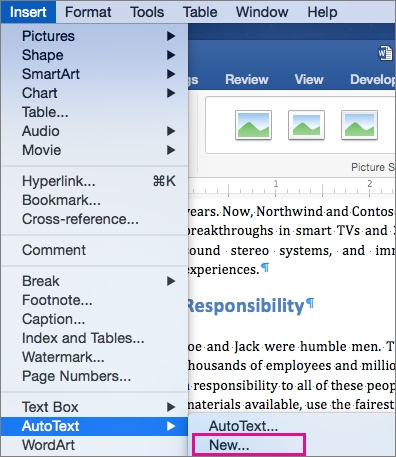
- Step 4. The “Create New AutoText” dialog box will then pop up. Name your signature block and then select “OK” button to save your signature.

How to add signature block in Word on Mac? Here come the steps:
- Step 1. Place your cursor in the document where you want to insert the signature block. Click the “Insert” tab, choose “AutoText” > “AutoText…”
- Step 2. The “AutoCorrect” dialog box will appear. In the “AutoText” tab, type the name of your AutoText block and select it.
- Step 3. And select “Inset” button, then your newly created signature block will be inserted into your document.
Now, you have learned how to add signature in Word on Mac with AutoText feature, go ahead and try!
Conclusion
All in all, we have explored how to create a digital signature for Word, how to insert signature in Word on Mac, and how to make a reusable signature with text to sign Word documents on Mac easily.
To create a signature in Word easily and quickly, we highly advised you to use the AnyEraser Electronic Signature Generator online tool. It can help you create a professional handwritten signature with only 1 click, while maintaining the original quality. By this way can you make your Word document formal and professional.
Start creating your signature with AnyEraser right now!
FAQ
1. How to add handwritten signature in Word on Mac?
Adding your handwritten signature to Word on Mac is super easy:
1. Write your signature on a paper and take a photo of it, save the photo in your Mac.
2. Use AnyEraser E-Signature Creator to remove the background of the signature image in seconds. Then, save the transparent signature in a PNG file.
3. Open your Word document, click where you want to add the signature, and go to the Insert tab > Pictures > Picture from File to insert handwritten signature in Word on Mac.
2. How to insert signature in Word on Mac for free?
1. Open the Preview app on your Mac. Click on File > Take Screenshot > From Selection… Then, capture any white area on your computer.
2. The screenshot will appear in a pop-up window. Click Markup > Sign icon > Create Signature.
3. Hold a paper with your signature in front of the camera. It will automatically recognize your handwritten signature. When your signature appears in the window, click Done.
4. Select the Sign icon again and choose your created signature.
5. Resize the signature, click on File > Save to save it on your Mac.
6. Open your Word file, click on where you want to insert a signature, and select Insert > Pictures > Picture from File to insert the signature from the local file.
3. How to add signature line in Word on Mac?
1. Open your Word document on Mac, click where you want to add a signature line.
2. Go to Insert tab > Signature Line
3. In a dialog box that pops up, you can fill in your name, phone number, etc., to your signature.
4. Click on OK when you are done. Then the signature line will appear in your Word document.


