6 Ways in GIMP to Remove Background: Comprehensive Guide
If you often take photos, chances are that you feel the backgrounds of some pictures give weird vibes or distract people’s attention from the subjects. A good solution to these problems is removing backgrounds with a suitable graphics editor.
This article will tell you how to make background transparent in GIMP, a powerful graphics editor and freeware alternative to Photoshop. There are six ways in GIMP to remove background from different types of pictures, and we’ll show their steps in detail with images. If you prefer simple steps, here is also a one-click online background remover.
Let’s get started.
Part 1. Remove Simple Background in GIMP
Many tools can remove background in GIMP. This part will discuss three GIMP background removal tools for images with simple backgrounds. We’ll show you what sort of image each tool is best for and the detailed steps of each tool.
Let’s dive in.
Fuzzy Select: Subject with High-Contrast Edges
Fuzzy Select tool is best for images with simple backgrounds and high-contrast subject edges. The procedure is that you select and then delete background in GIMP. Once you click a spot in an image, this tool will automatically make a continuous selection of colors similar to the spot, and you can select the whole background with multiple clicks.
Now, let’s see how to delete background in GIMP with Fuzzy Select tool.
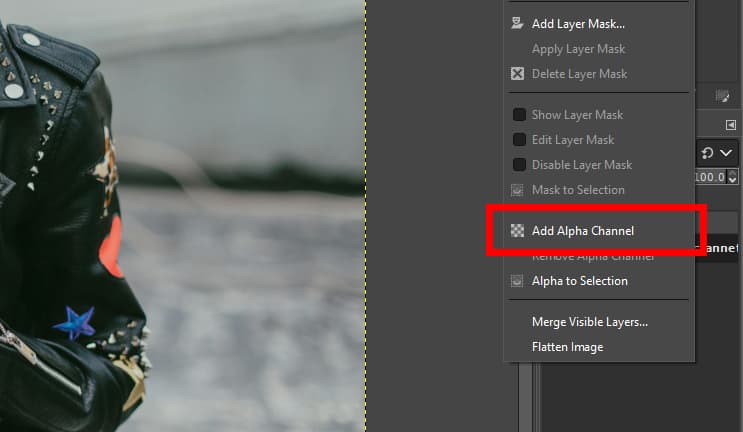
- Step 1. Open a picture in GIMP. Go to the layers panel at the bottom-right, right-click the current layer, and choose Add Alpha Channel. This step is necessary because only images with alpha channels support transparency.
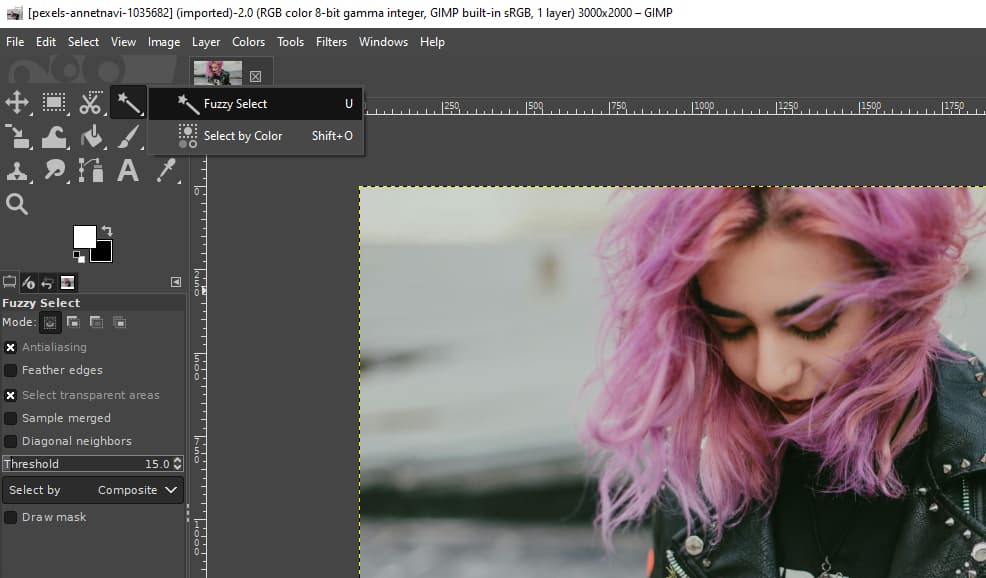
- Step 2. Now, choose the Fuzzy Select tool in the toolbox, which is grouped with the Select by Color tool.
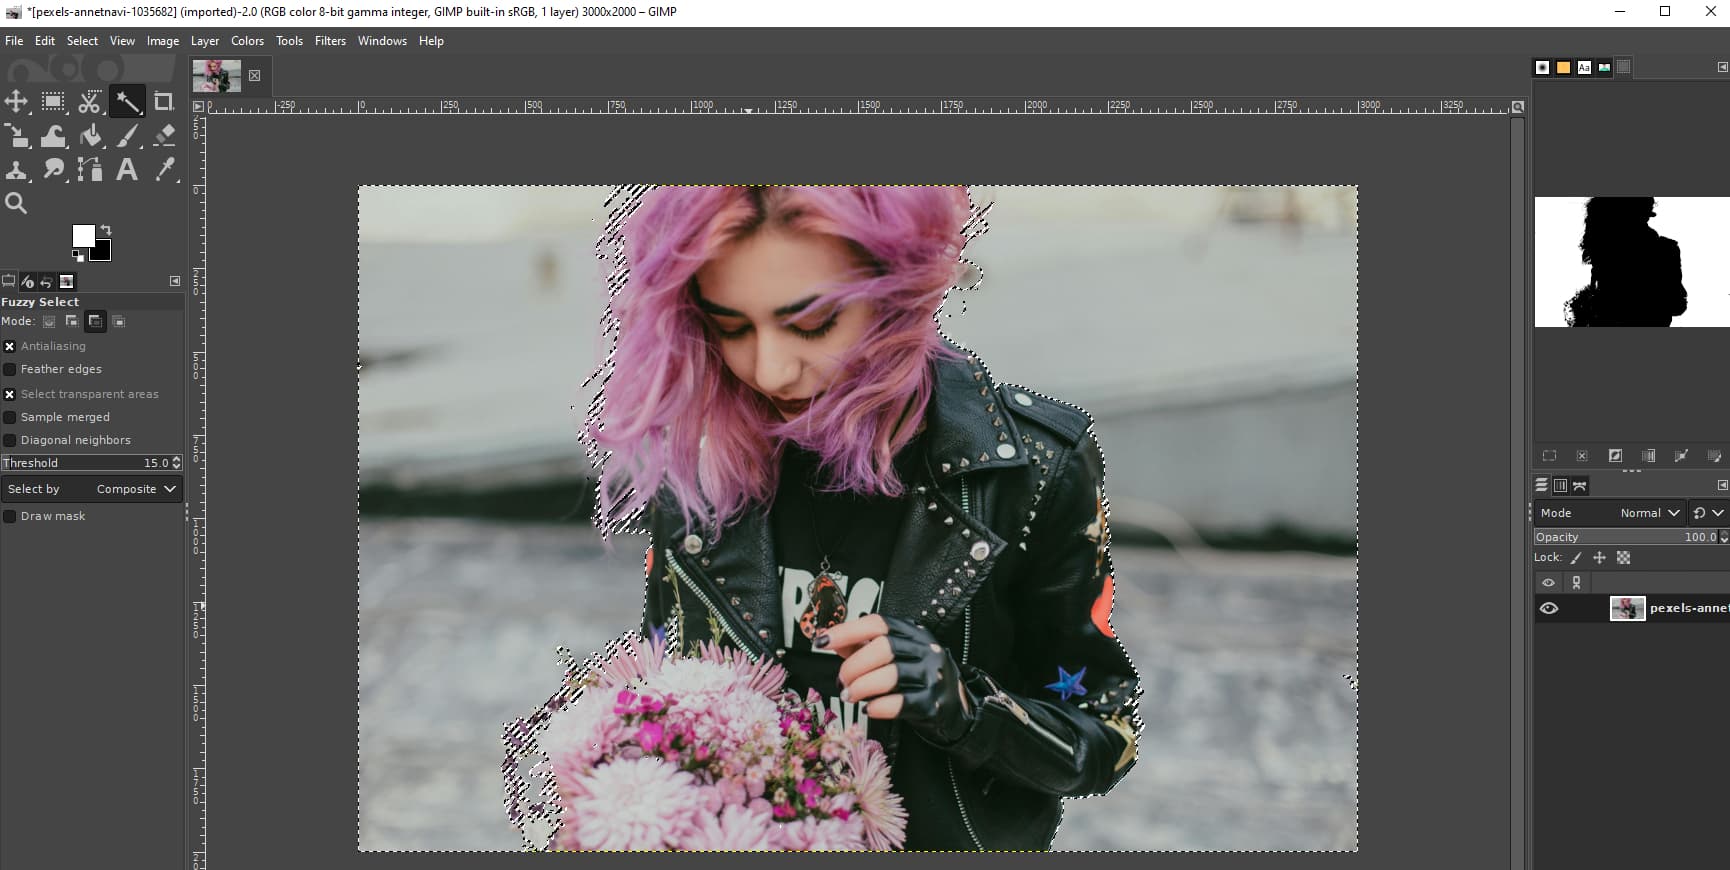
- Step 3. Click to select a background area. Hold on Shift and click an area to add it to the selection; hold on Ctrl andclick an area to subtract it from the selection.
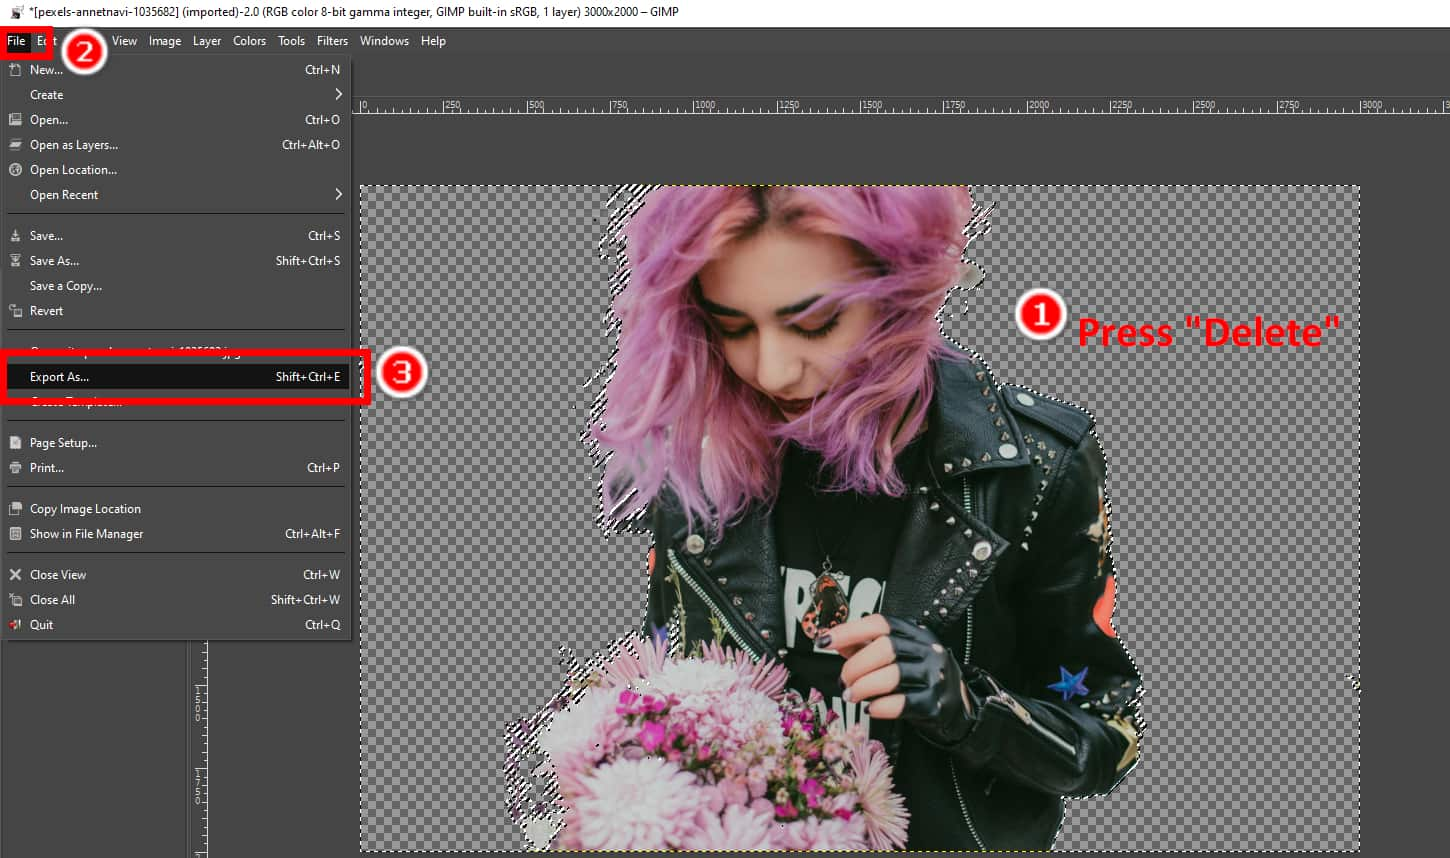
- Step 4. Finally, press Delete to remove background from image in GIMP. Then, click File > Export As and save the output as a transparent PNG file.
Select by Color: Discontinuous Solid Background
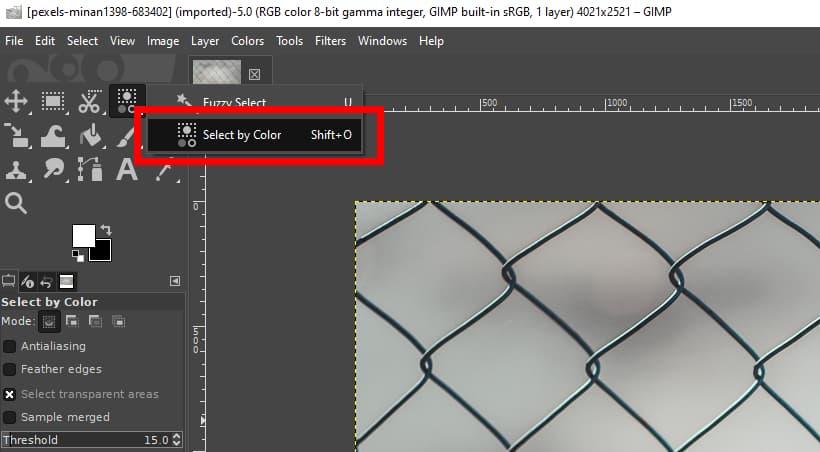
Like the Fuzzy Select tool, the Select by Color tool selects similar colors in an image. The difference is that the former tool’s selection is somewhat continuous, while the latter can be discontinuous. Thus, if an image has a discontinuous solid background, such as an image of fences or foliage, you can utilize this tool in GIMP to remove background from image.
Next, we’ll show you how this tool in GIMP makes background transparent.
- Step 1. Open a picture in GIMP and right-click the current layer to Add Alpha Channel to it.
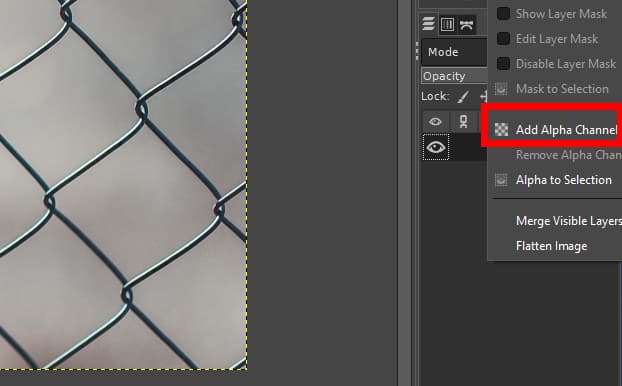
- Step 2. Go to the toolbox and choose the Select by Color tool, which is grouped with the Fuzzy Select tool.
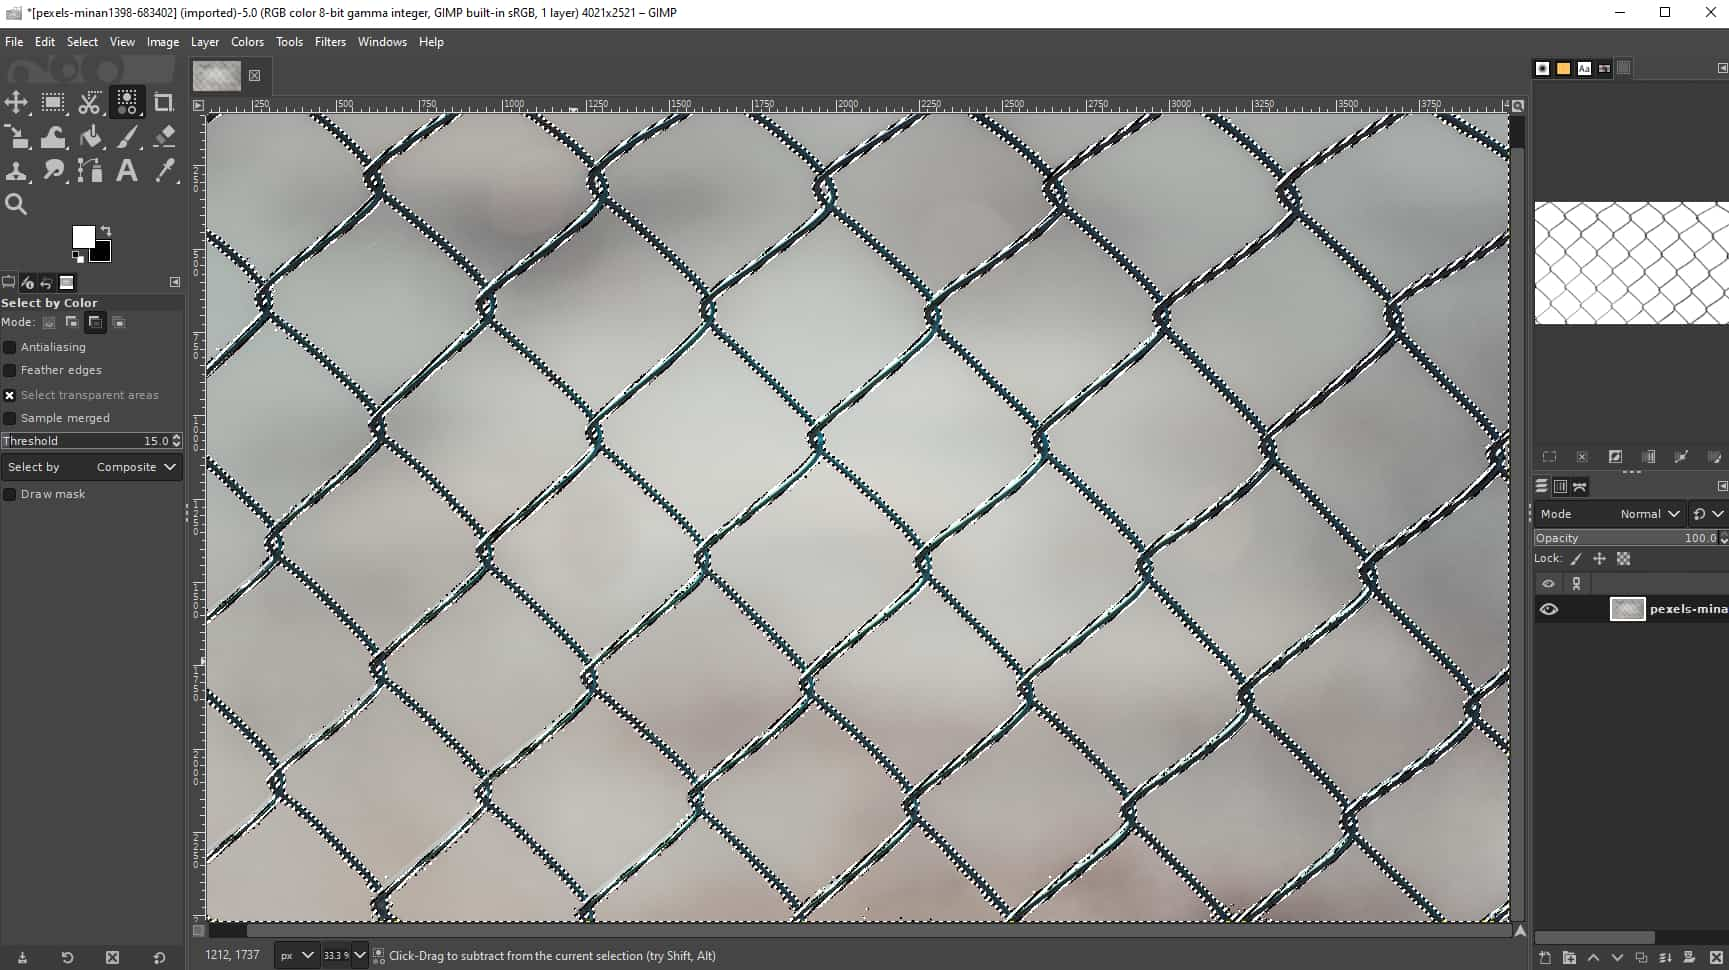
- Step 3. Now, click a spot in the background to choose all similar background colors. If some parts are not selected, click these parts one by one until you select the whole background.
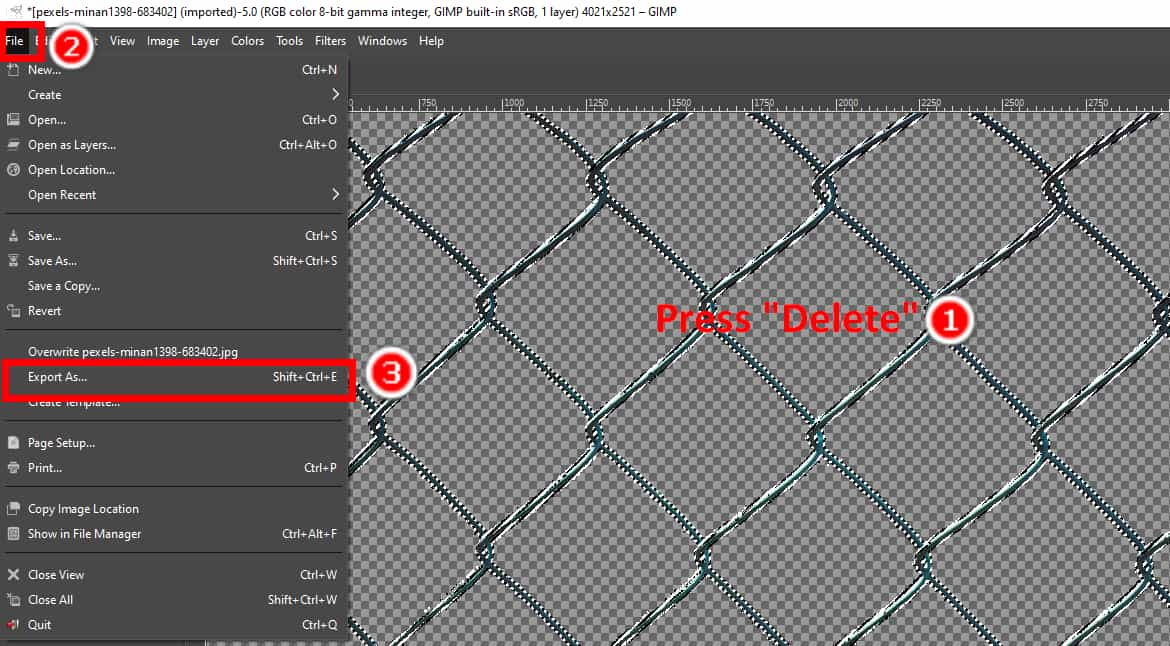
- Step 4. Finally, press the Delete key to remove background in GIMP. Then, click File > Export As to save the output. Note that you should save it as a PNG file which supports transparency.
Layer Mask: Subject with Intricate Details
The layer mask is good for subjects with intricate details like furs or hair strands. Moreover, it is a non-destructive tool in GIMP to make background transparent. You can hide or reveal the background by simply adding or deleting the layer mask without affecting the original image.
Now, we’ll show you how to make background transparent in GIMP with this tool.
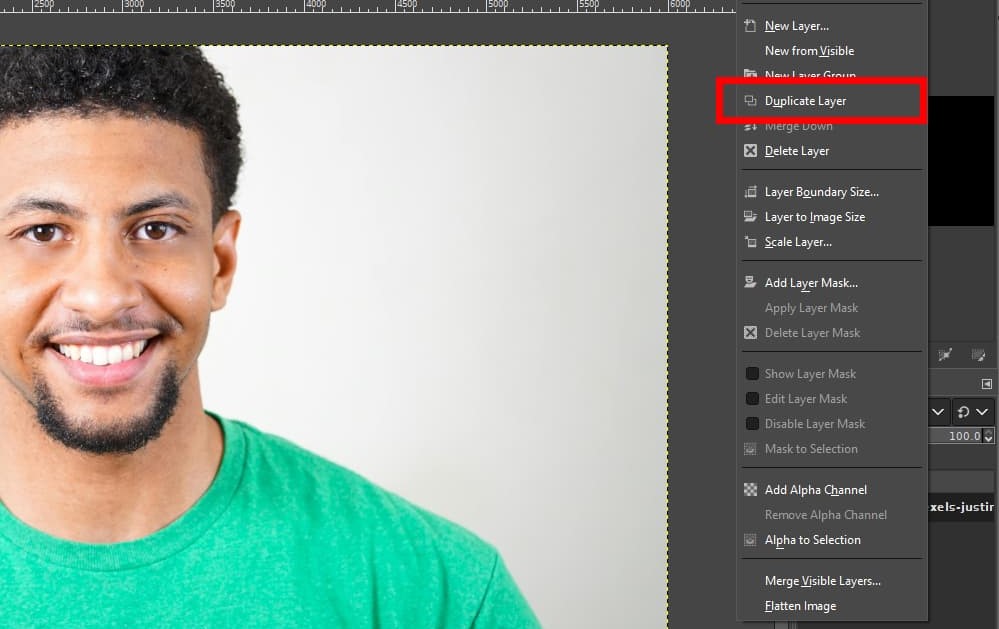
- Step 1. Open a photo in GIMP, right-click the current layer and choose Duplicate Layer.
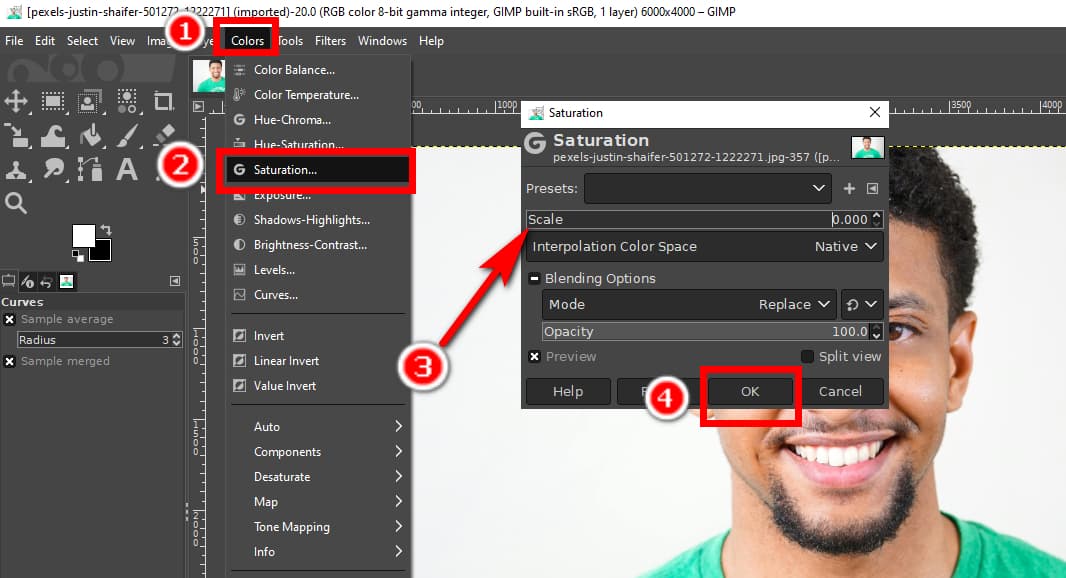
- Step 2. Hit Colors > Saturation, and a pop-up window appears. Drag the Scale to zero and click OK.
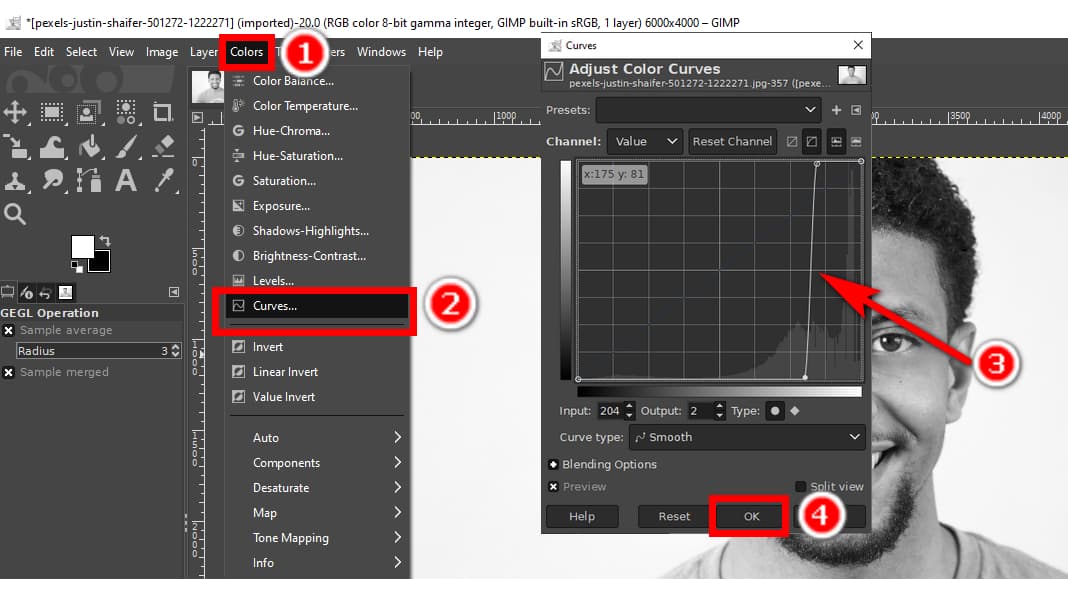
- Step 3. Click Colors > Curves. Adjust the color curve in the pop-up window until the subject is entirely black, and the background is nearly white.
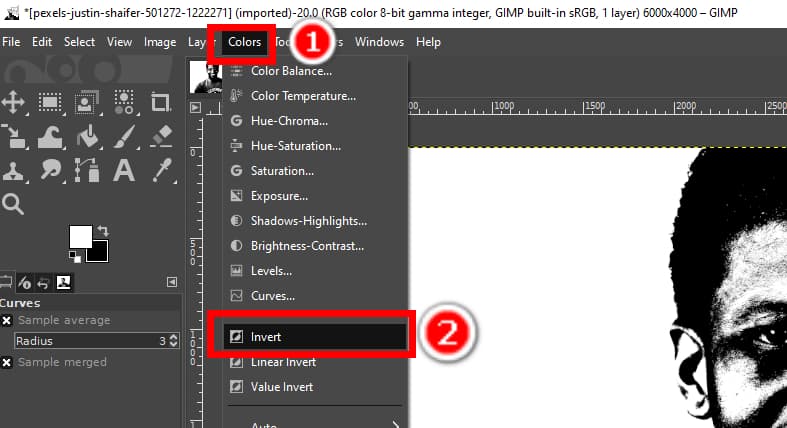
- Step 4. Click Colors > Invert.
- Step 5. Click Edit > Copy Visible.
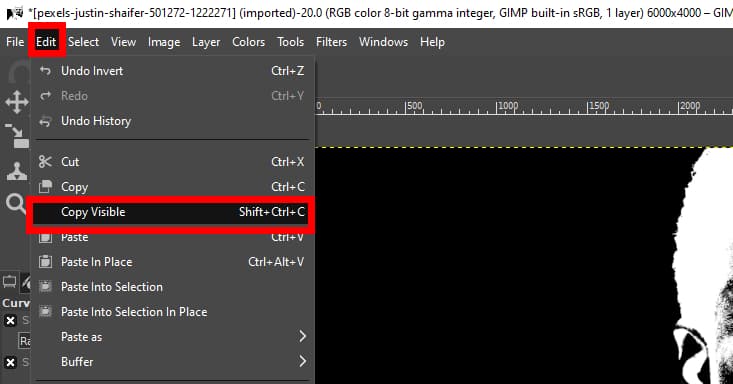
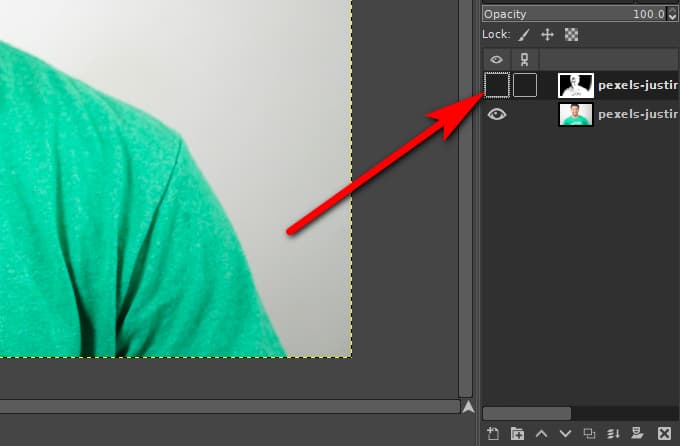
- Step 6. Go to the layers panel and click the visibility icon on the current layer to make it invisible.
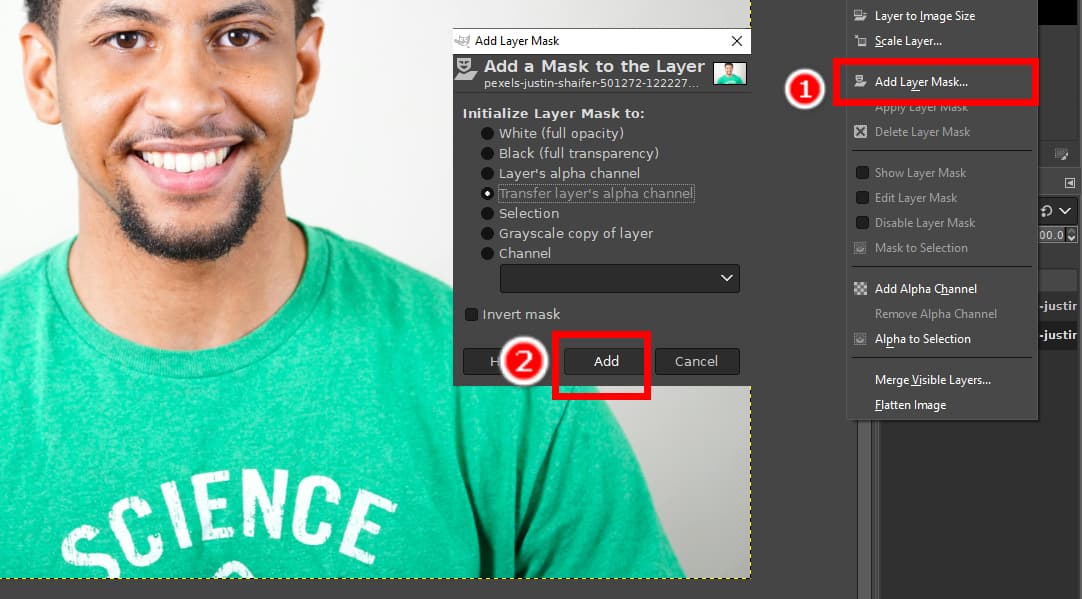
- Step 7. Right-click the original layer, hit Add Layer Mask, and click OK in the pop-up window.
- Step 8. Click Edit > Paste.
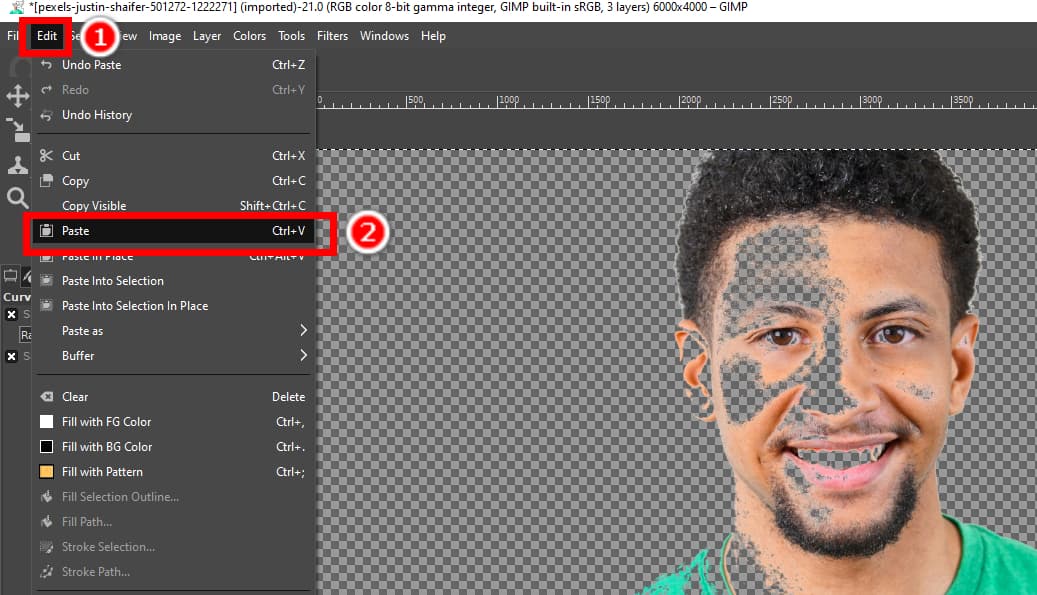
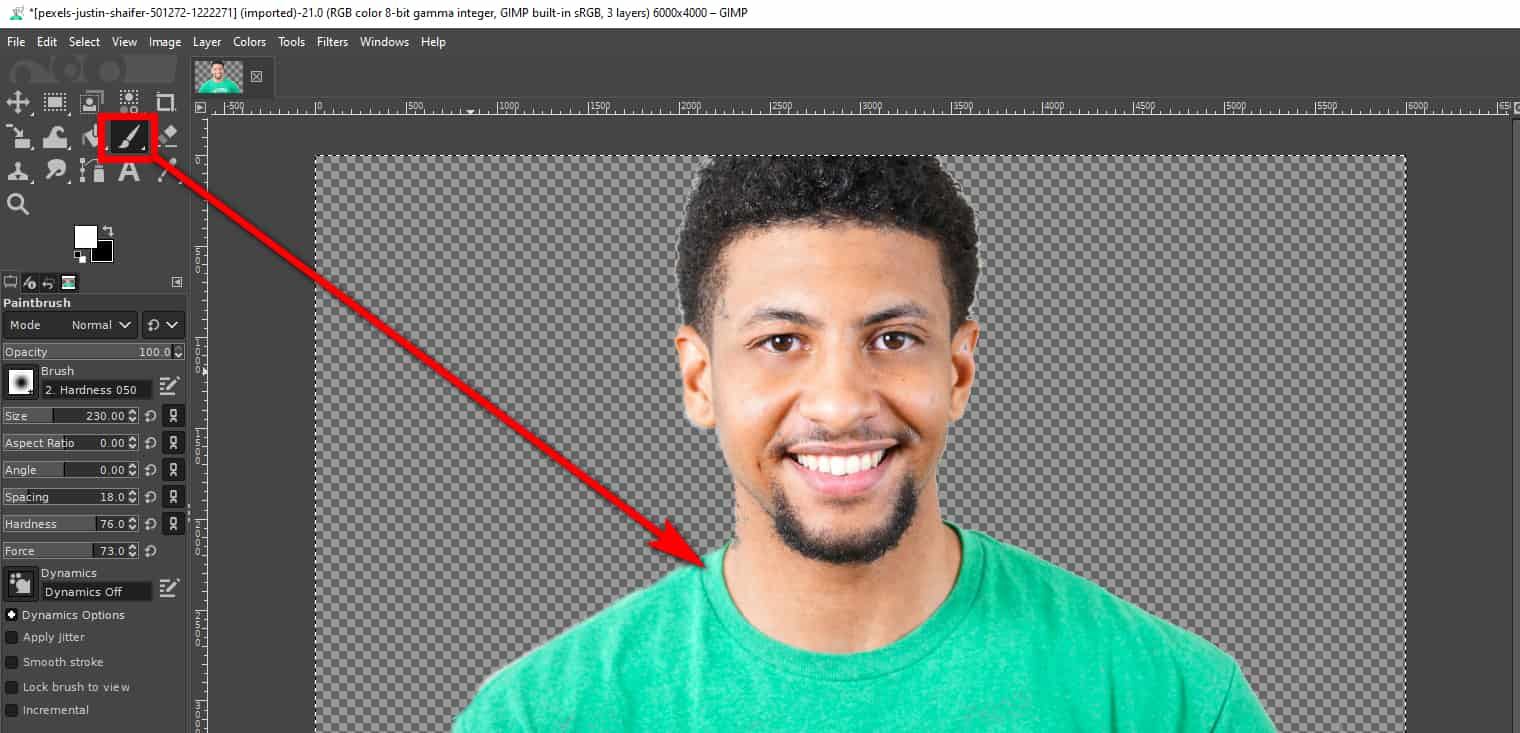
- Step 9. Finally, remove the imperfections with the Brush tool. The white brush is for recovery and the black is for removal. Then, save the output.
Part 2. Remove Complex Background in GIMP
As for simple backgrounds, you can directly select and remove background in GIMP with ease using the aforementioned tools. However, if images have intricate backgrounds, selecting the whole backgrounds will consume much time, energy, and patience. In this case, you can select the foreground instead and invert the selection later.
This part introduces three tools in GIMP to delete backgrounds of intricate colors. We’ll tell you their features, advantages, and steps. Let’s go.
Scissors Select: Intelligent Edge-Detection Algorithm
If an image has high-contrast edges between the subject and the background, you can make background transparent in GIMP with a convenient tool, Scissors Select. It has an intelligent edge-detection algorithm, which tries to fit the border around the subject automatically.
Below are steps of this tool in GIMP to remove background.
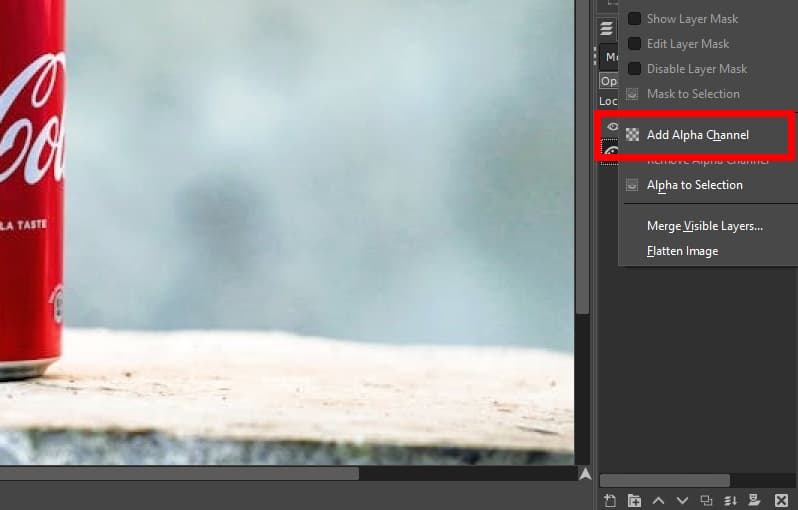
- Step 1. Open a photo in GIMP, right-click the current layer, and choose Add Alpha Channel.
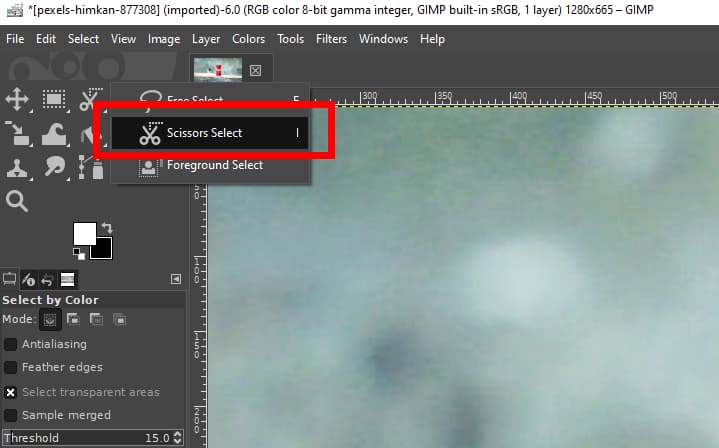
- Step 2. Choose the Scissors Select tool in the toolbox. It is grouped with the Free Select tool and Foreground Select tool.
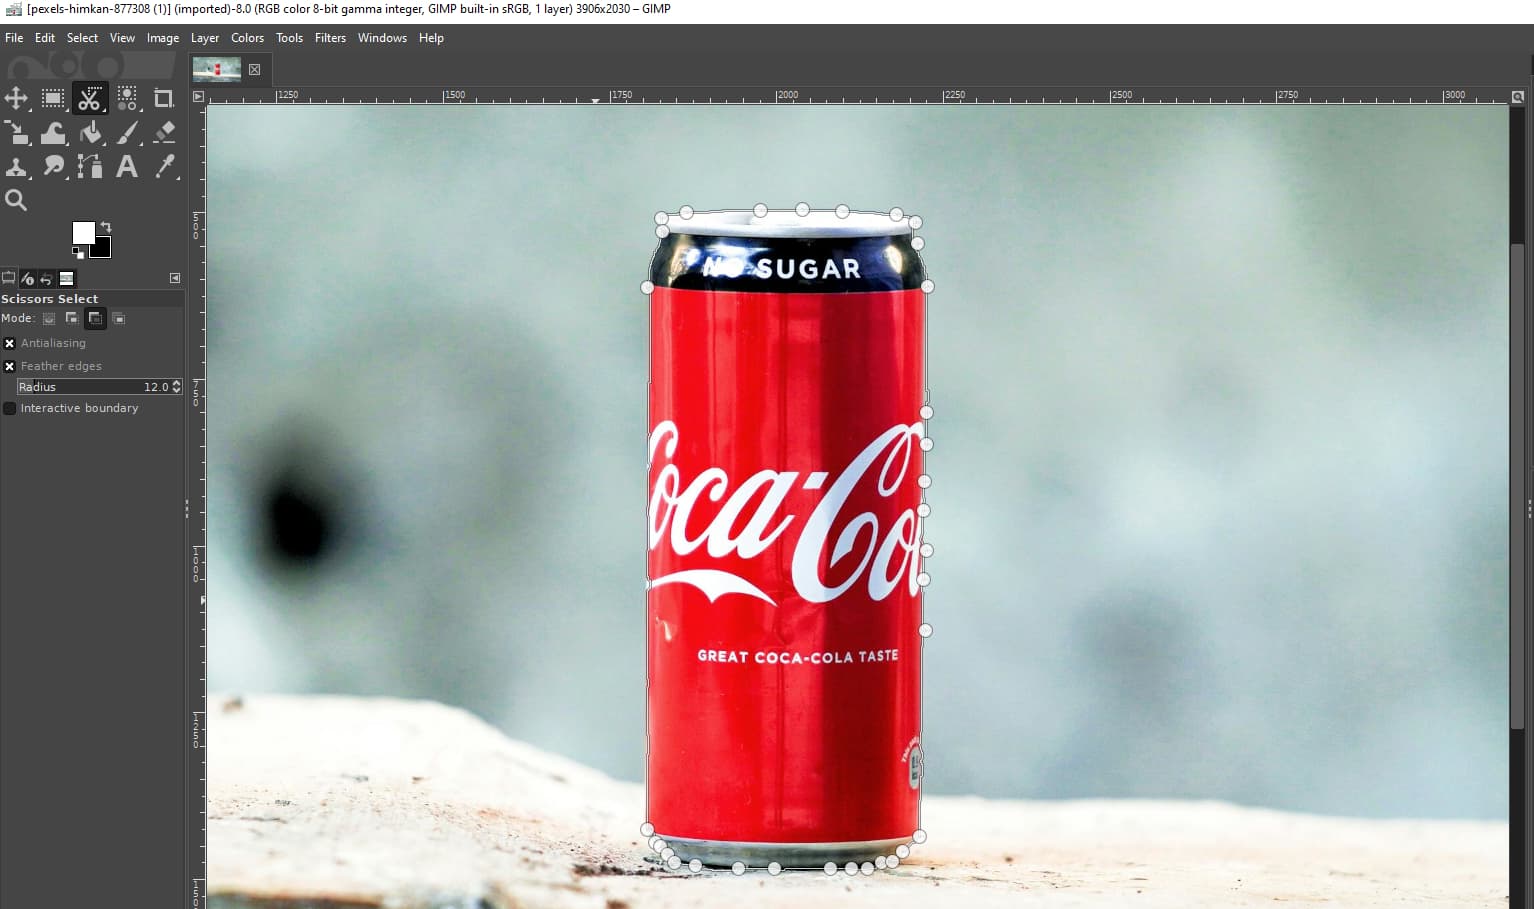
- Step 3. Now, start outlining the subject. First, you click to lay a point around the subject border, and then lay another point on the border. The two points will be linked by a curve that tries to follow the subject edges. Add points one by one until you select the whole subject. You can press Backspace to cancel the last segment.
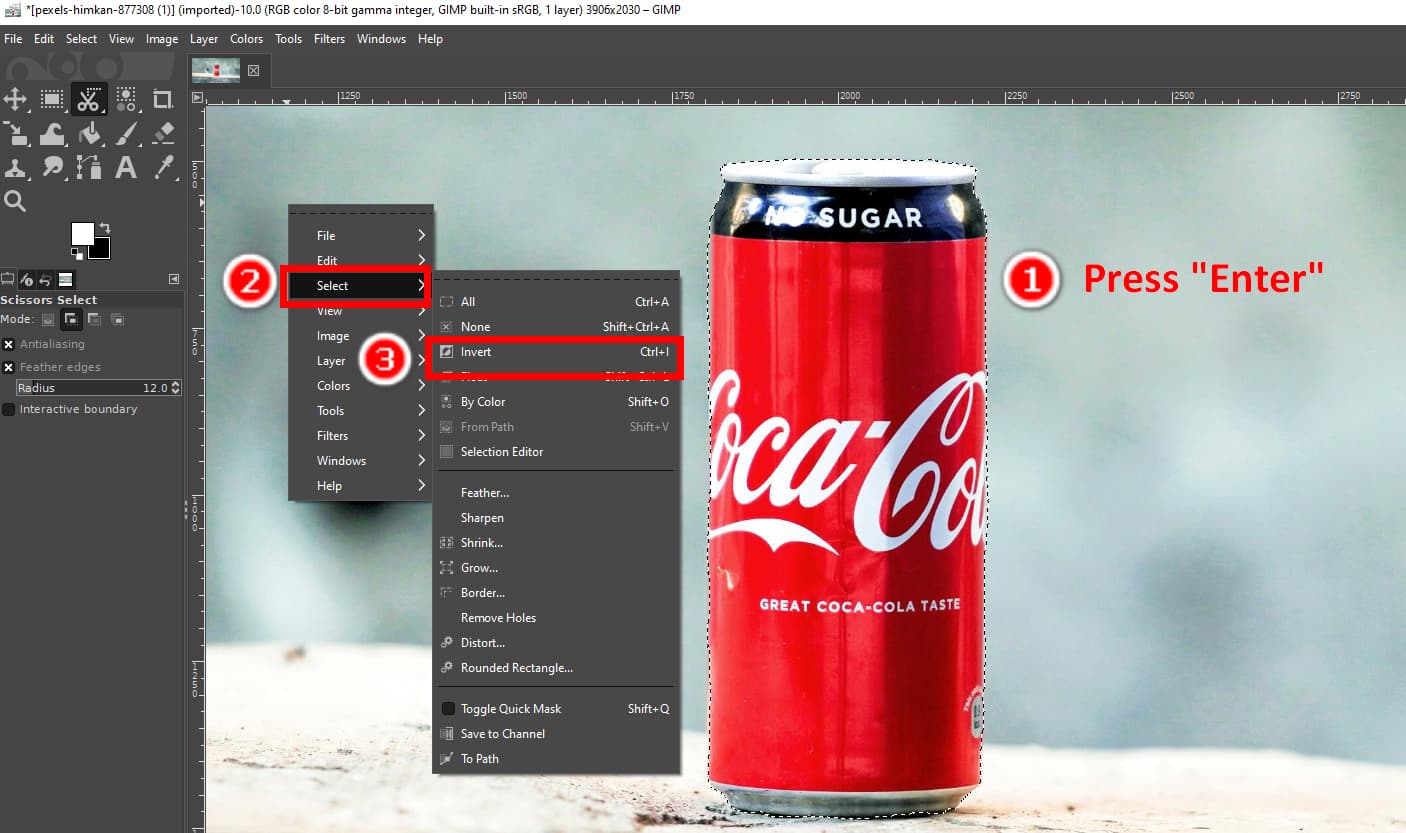
- Step 4. Now, press Enter to confirm the selection. Then, right-click the image and choose Select > Invert to select the background.
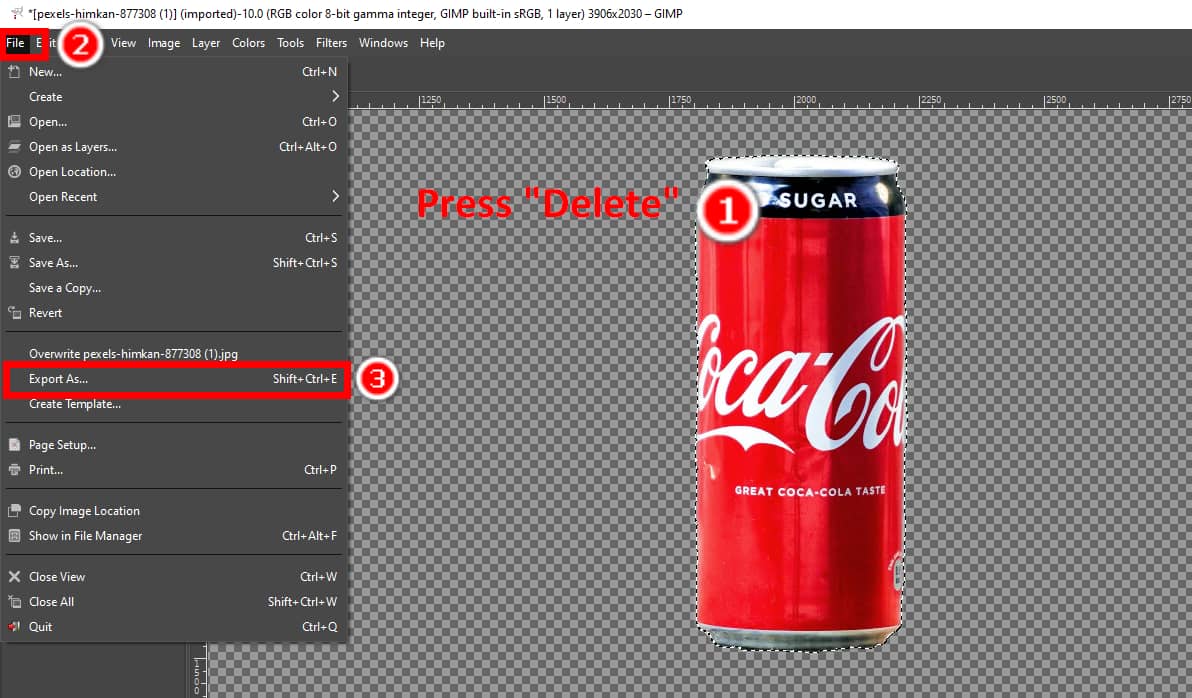
- Step 5. Finally, press the Delete key to delete background in GIMP. Click File > Export As to save the output as a PNG with a transparent background.
Paths Tool: Output with Crisper Edges
The Paths tool outlines an image’s subject with adjustable lines and curves between anchor points. It is best for subjects with even edges and is unsuitable for subjects with jagged edges like hairs or furs.
Let’s move on to learn how to remove background of image in GIMP with the Paths tool.
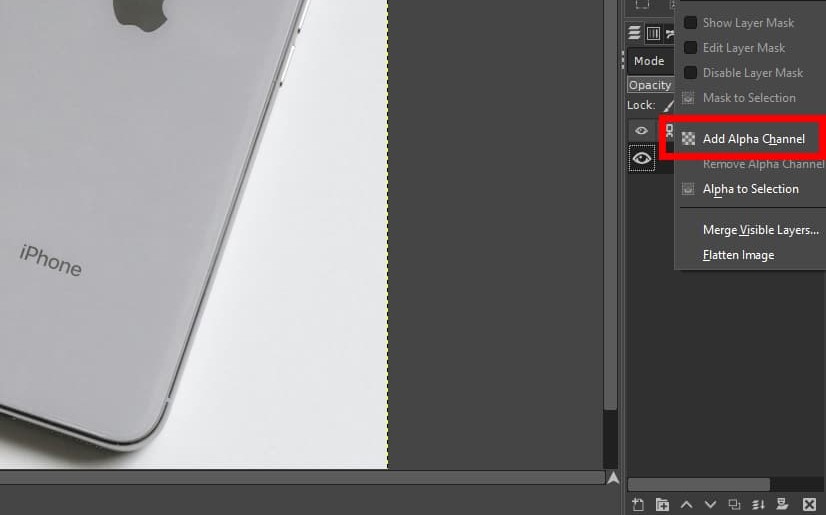
- Step 1. Open a photo in GIMP. Right-click the layer and choose Add Alpha Channel.
- Step 2. Now, draw the subject’s outline with lines and curves. Click to add two anchor points, and a line will appear between the two points.
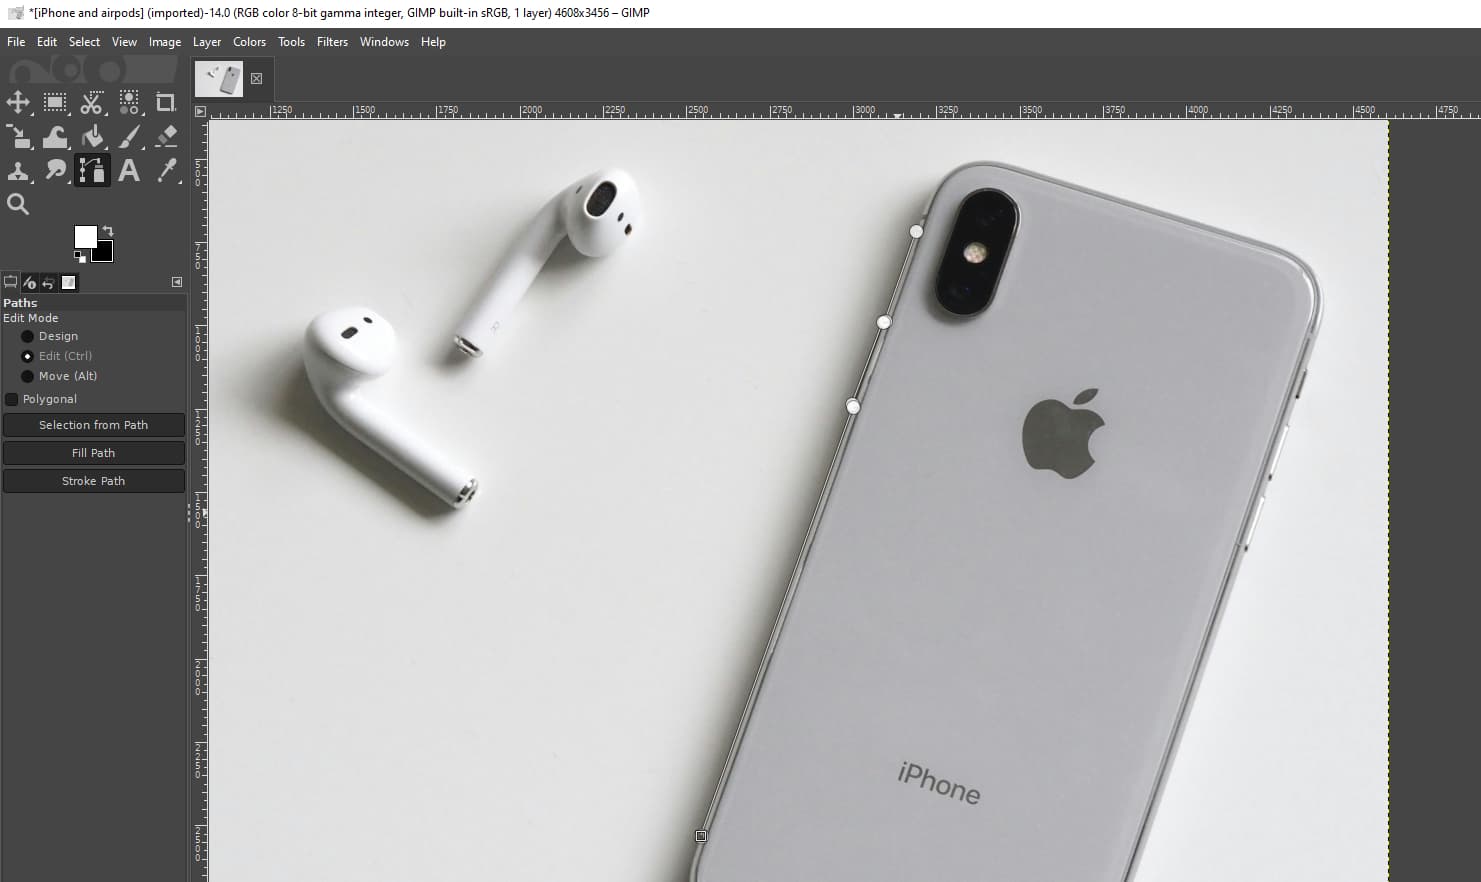
- Step 3. Creating curves requires slightly more steps. Ctrl-click an anchor point and drag your cursor to make a yellow direction line that controls the length and shape of a curve. Then, add another point to make a curve. To modify the curve, click the initial point of a curve to adjust the direction line and click the end-point to determine the adjustment.
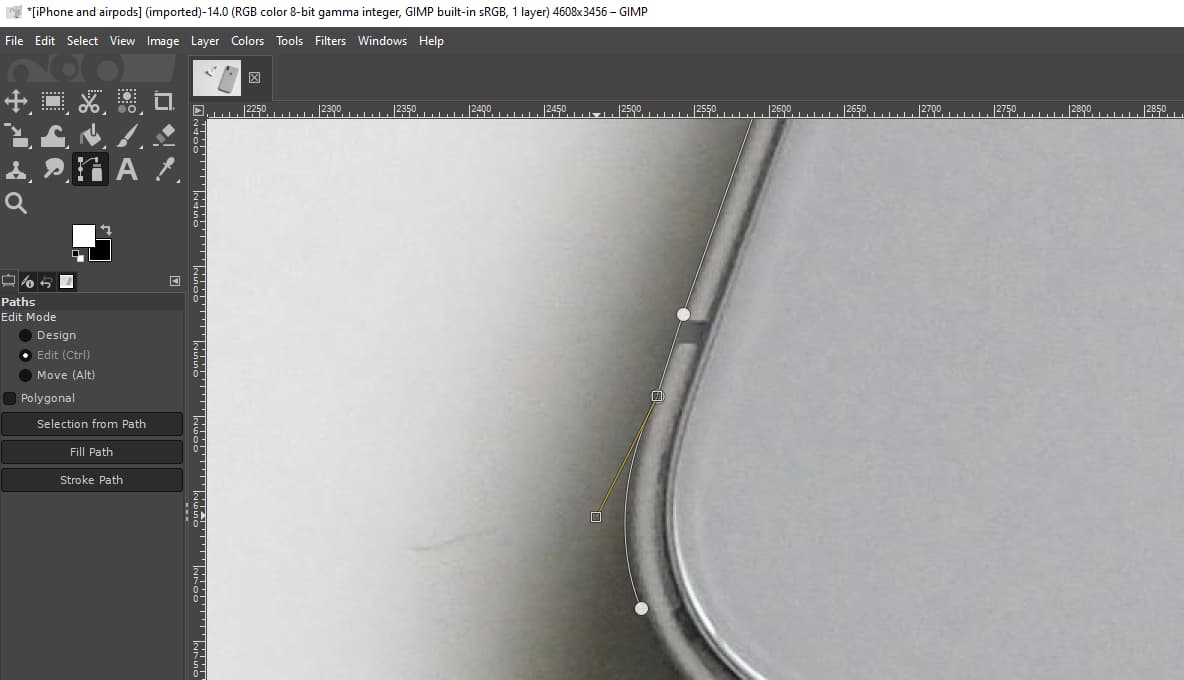
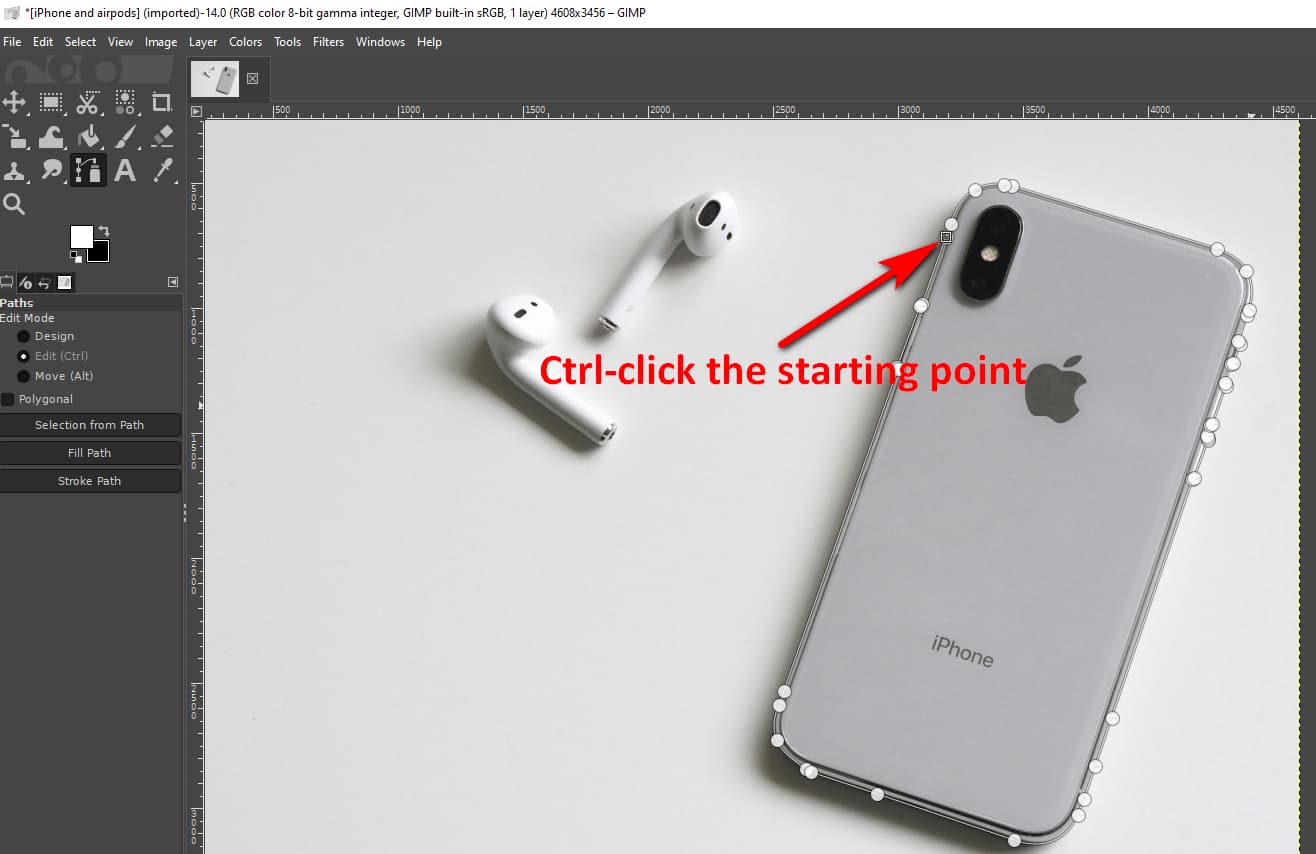
- Step 4. Draw lines and curves to outline the subject. When finishing the outline of a subject, click the starting point to close the path.
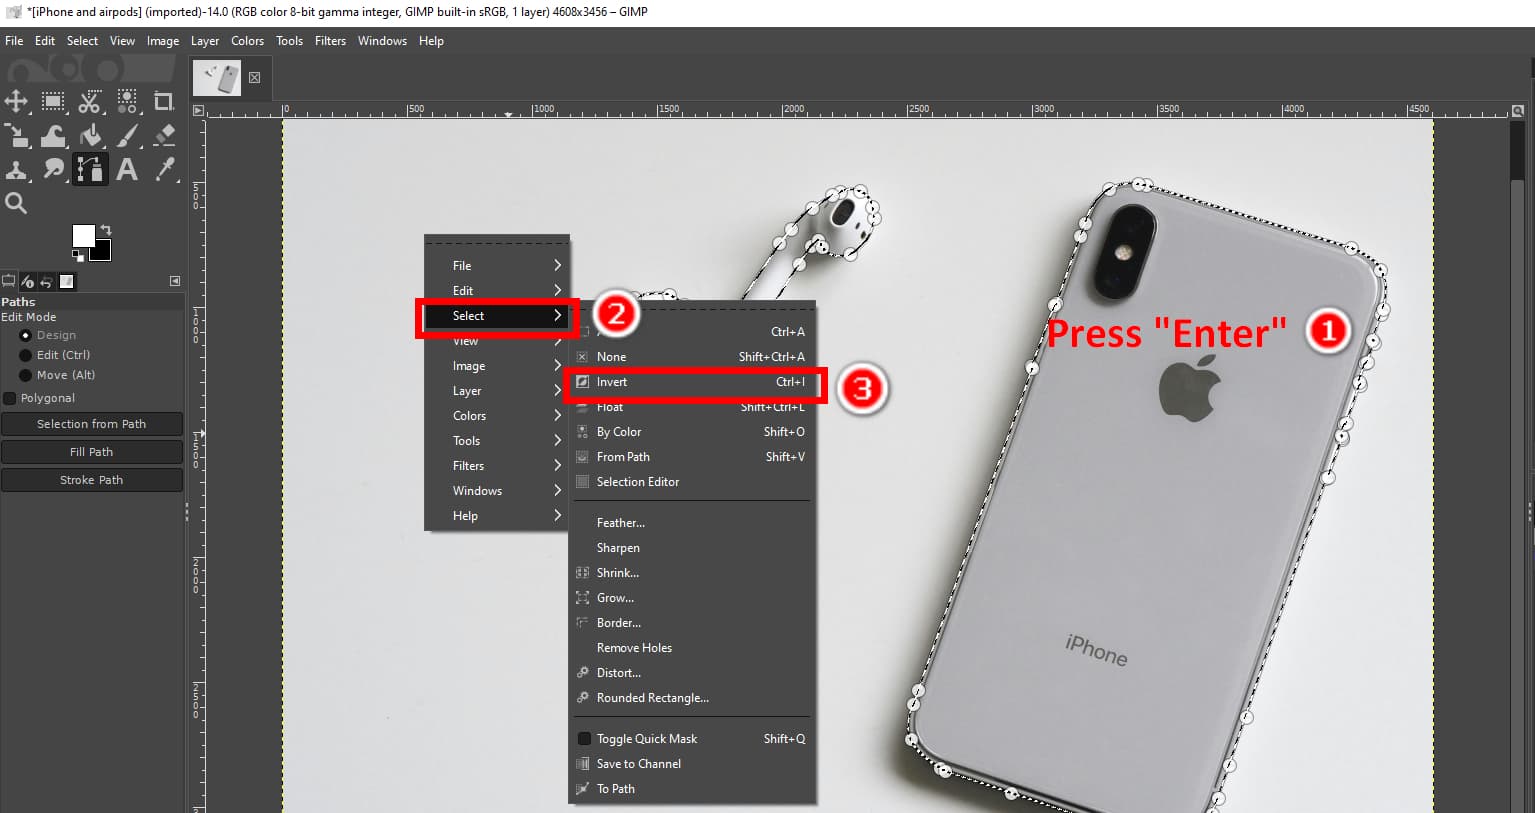
- Step 5. After you outline all subjects in an image, press Enter to convert the path into a selection. Then, right-click and choose Select > Invert to select the background.
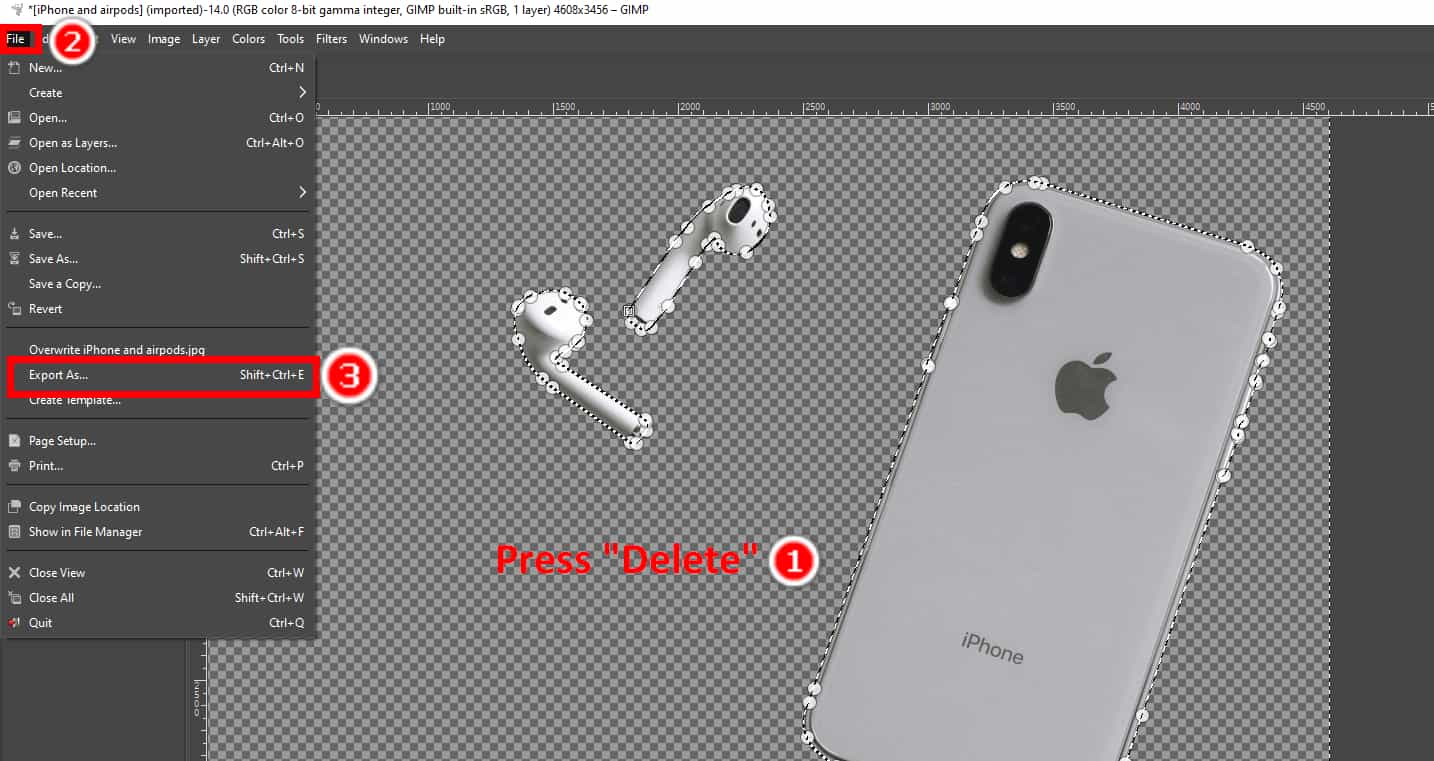
- Step 6. Finally, press Delete to make background transparent in GIMP. Then, click File > Export As and save the output as a PNG with a transparent background.
Foreground Select: Fewest Skills and Easiest Steps
Foreground Select is a convenient tool in GIMP to make transparent background with the fewest skills needed. It is a semiautomatic tool that turn your approximate marking of a subject into a precise selection.
Now, let’s go to learn this efficient GIMP background removal method.
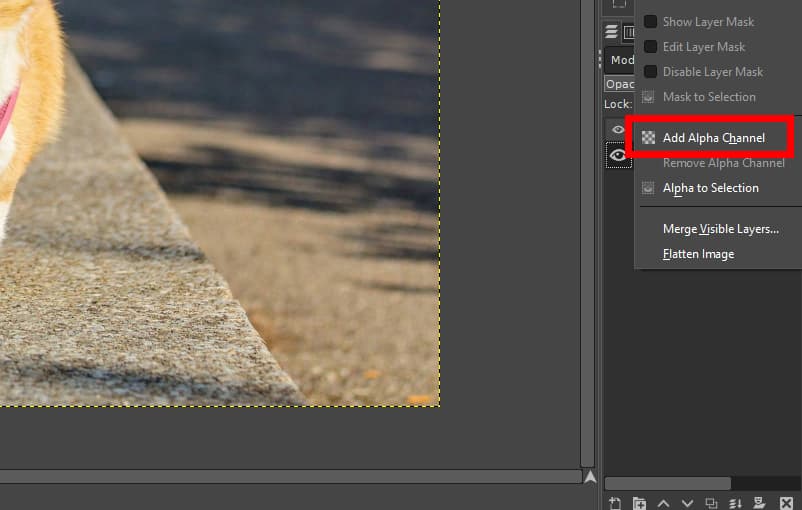
- Step 1. Open an image and add an alpha channel to the current layer.
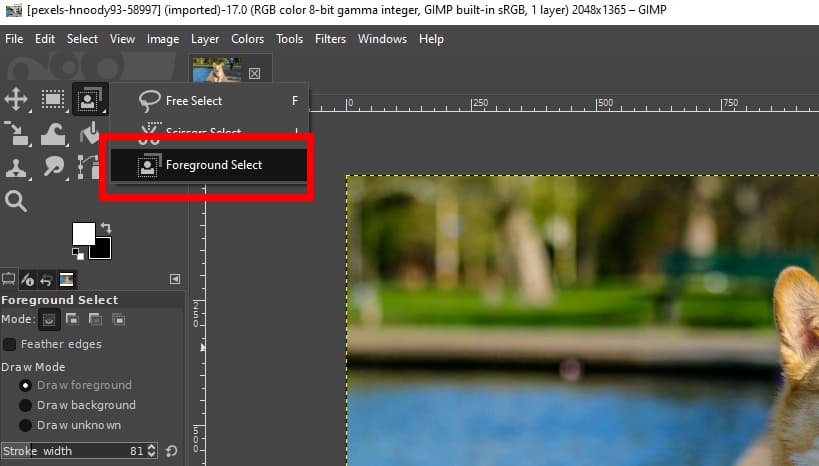
- Step 2. Choose the Foreground Select tool in the toolbox.
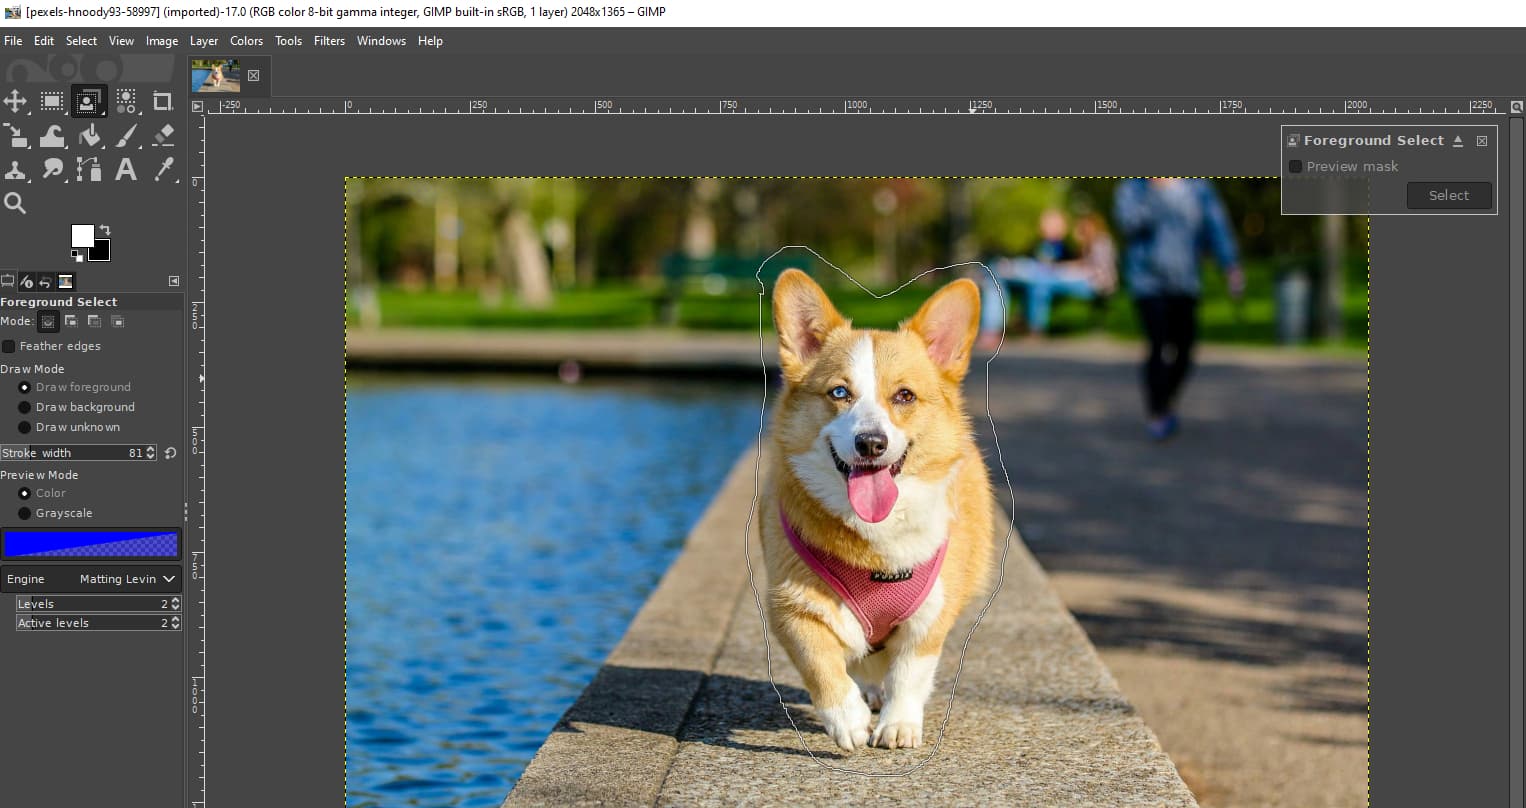
- Step 3. Roughly outline the subject. It doesn’t have to be precise; juts ensure it contains the whole subject.
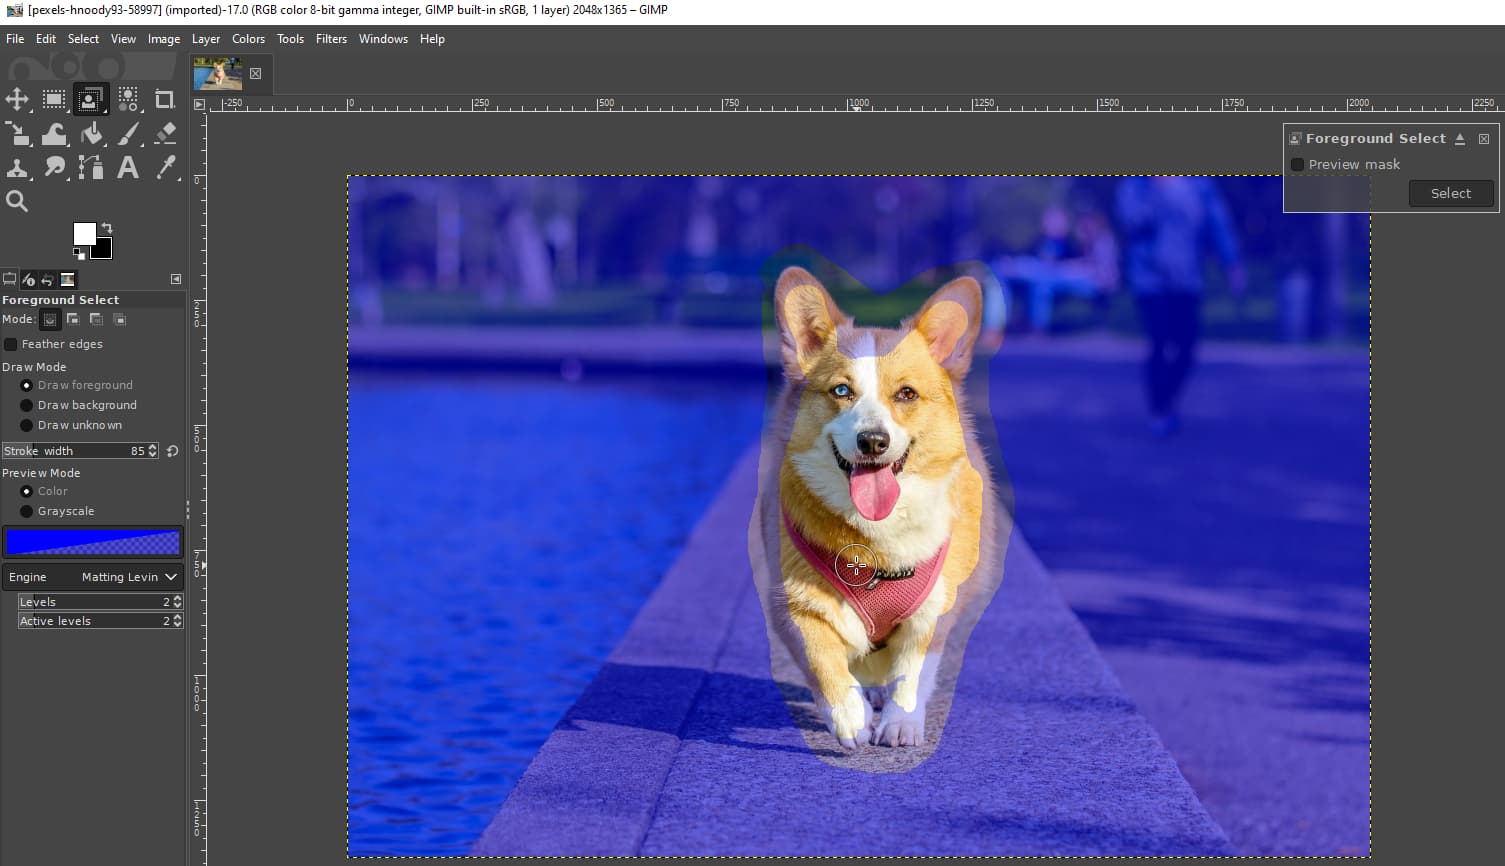
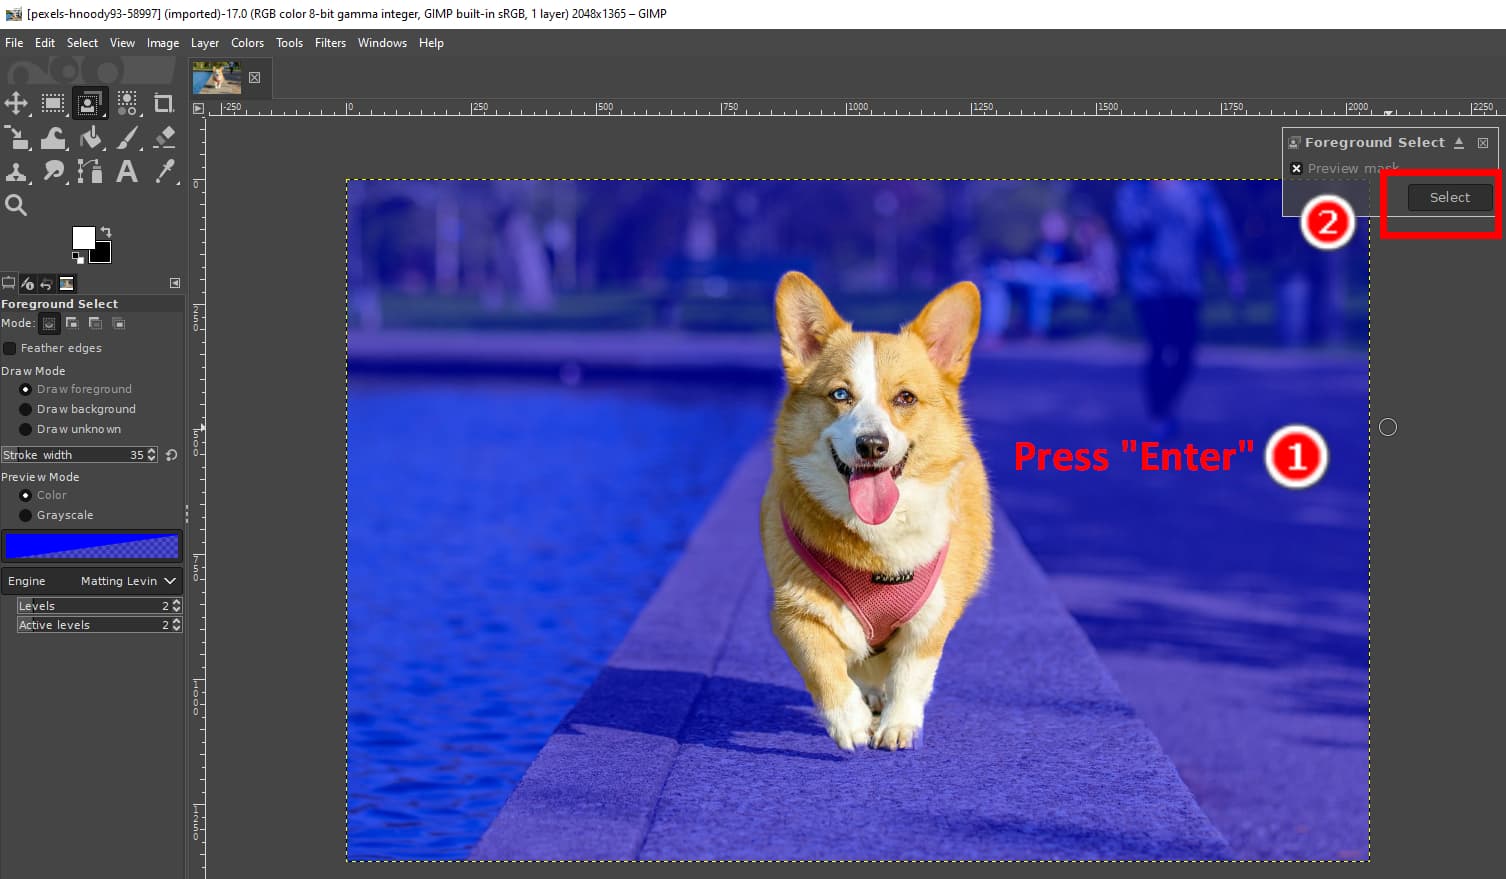
- Step 4. Press Enter, and you will see the background in dark blue and foreground in light blue. Remove the light blue color with your cursor (now a brush tool) inside the subject for GIMP to better recognize the foreground. Ensure that you stay within the subject edges.
- Step 5. Press Enter and click Select on the top-left to determine the selection.
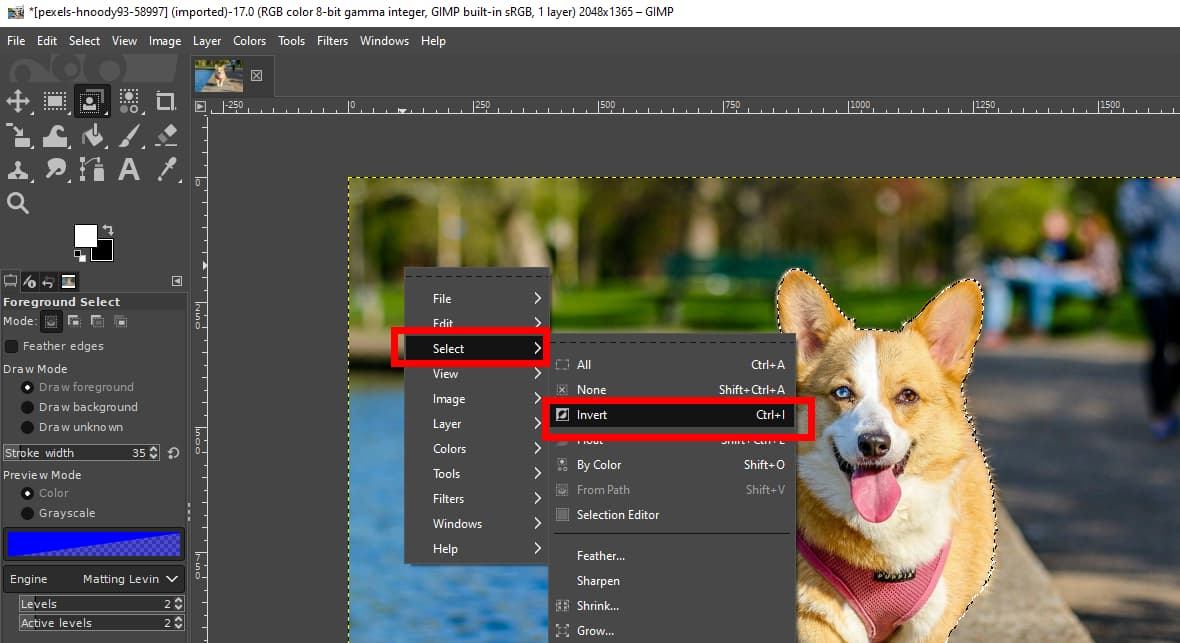
- Step 6. Right-click and choose Select > Invert to select the background.
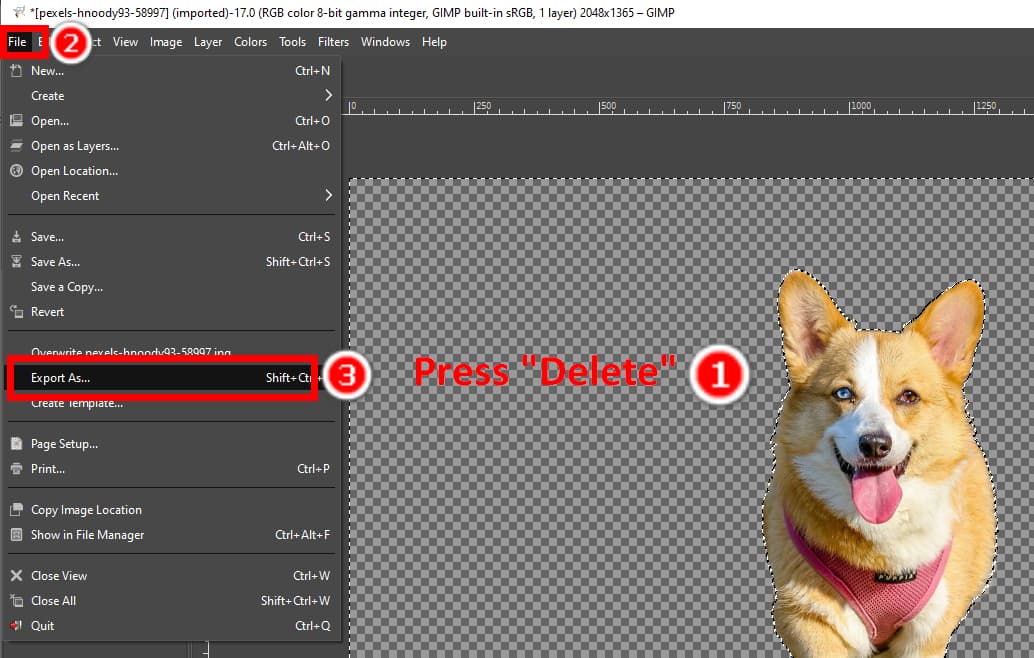
- Step 7. Press Delete to erase background in GIMP. Then, hit File > Export As to save the output as a PNG image.
Part 3. Free Online Automatic Background Remover
It requires much time and expertise to make background transparent in GIMP with various tools and complex procedures. AnyEraser Online Background Remover is a more convenient and efficient tool.
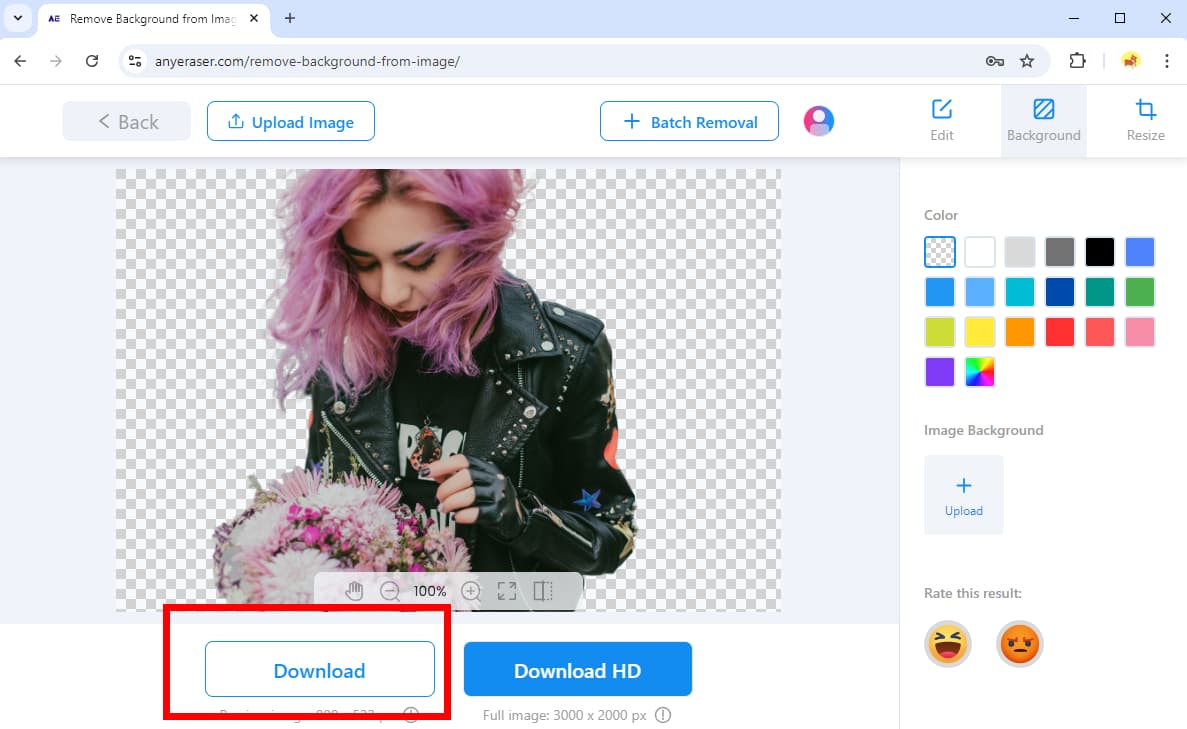
AnyEraser is a free online automatic background remover. It has an intuitive interface and an AI-based algorithm; you need only one click to make backgrounds transparent. Equipped with the smart algorithm, AnyEraser can remove backgrounds from images in five to ten seconds. Whether your images are simple, complex, or with tricky details like hairs, furs, low-contrast edges, etc., AnyEraser will produce perfect cutouts with clean edges.
Follow us to read how to delete images’ backgrounds in AnyEraser.
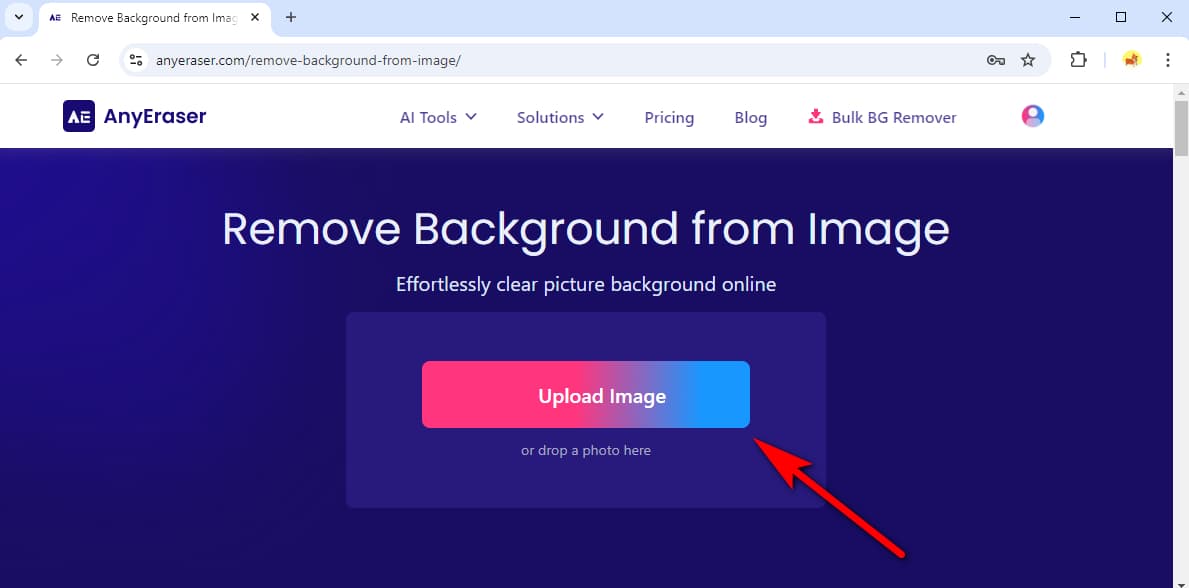
- Step 1. Go to AnyEraser Free Background Remover, click Upload Image, and pick a picture on your device.
- Step 2. AnyEraser will remove the background in seconds. Then, hit Download to save the image with a transparent background.
Conclusion
This article teaches you six methods in GIMP to remove background. Each method handles a specific kind of image. We have shown you their features, advantages, and steps, aiming to solve all the problems you will meet.
If the steps seem too complex, you can also try AnyEraser, a free online automatic background remover that makes backgrounds transparent in one click.
Thanks for reading.
FAQ
1. How can I remove backgrounds from images in GIMP easily?
You can use the Foreground Select tool. Open a photo, right-click the layer, and choose Add Alpha Channel. Pick the Foreground Select tool in the toolbox, draw a rough selection of the subject, and press Enter. Then, draw inside the subject, press Enter, and hit OK on the top-right. Next, right-click and choose Invert. Finally, press Delete to remove the background.
2. What is the easiest way to remove image backgrounds?
The quickest and most precise way is turning to AnyEraser free online background remover. It has a smart algorithm to remove backgrounds from images automatically, and all you need is one click.


