Blur Tool in Photoshop: Tutorial for Beginners
The Blur tool of Photoshop is a versatile tool that can be used in multiple ways to retouch photos. There is a set of different blur filters for various use. You can blur a certain area of an image to hide some private information, or blur the background to draw people’s focus on an object. Or maybe you want to enhance the quality of an image, like adding motion to a picture of softening the jagged edges of an object.
Photoshop blur tool is powerful. However, when you try to make use of this multi-functional tool, you may feel puzzled by its different kinds of filters and uses. Which filter should one use? For which purpose a filter is used? In this tutorial we are going to show you how to blur image in Photoshop in comprehensive and simple words.
How to Blur Background in Photoshop
Photoshop provides us with multiple ways to blur background of an image. You can choose Blur tool in the tools panel and draw an area to blur it with blur brush, or make a selection of an area with select tools and apply various Blur Filters to it. Move on to read the detailed steps.
Method 1. Use Blur Tool to Blur Background
Photoshop Blur Tool allows you to draw an area where you want to blur with a blur brush. You can use it to blur any area conveniently, yet it will be time-consuming and monotonous to use. The following steps show you how to use the Blur Tool in Photoshop. Just move to read.
- Step 1. Select Blur brush on the left tools panel. Then, your cursor will turn into a circle and on the top will be a panel for you to modify your blur brush tip, like its size or hardness.
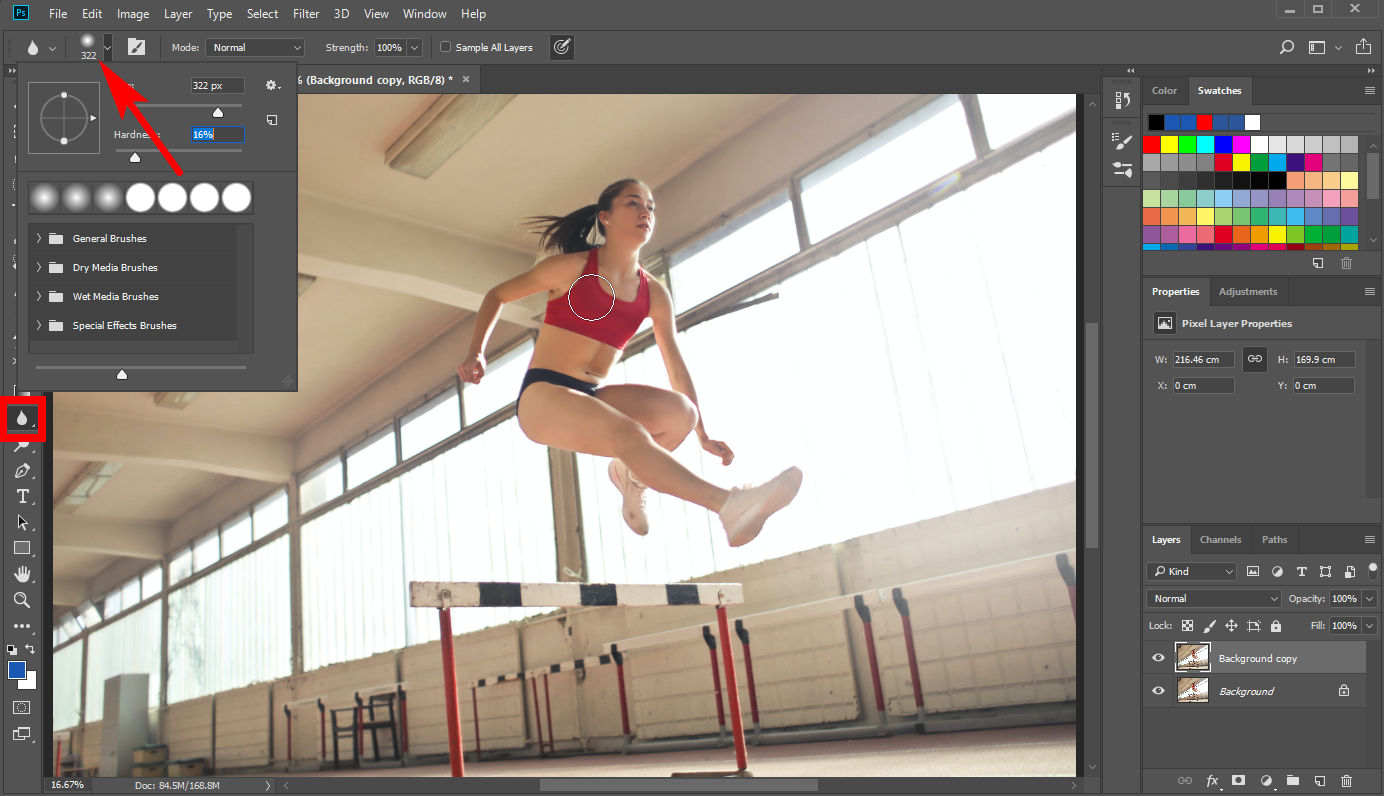
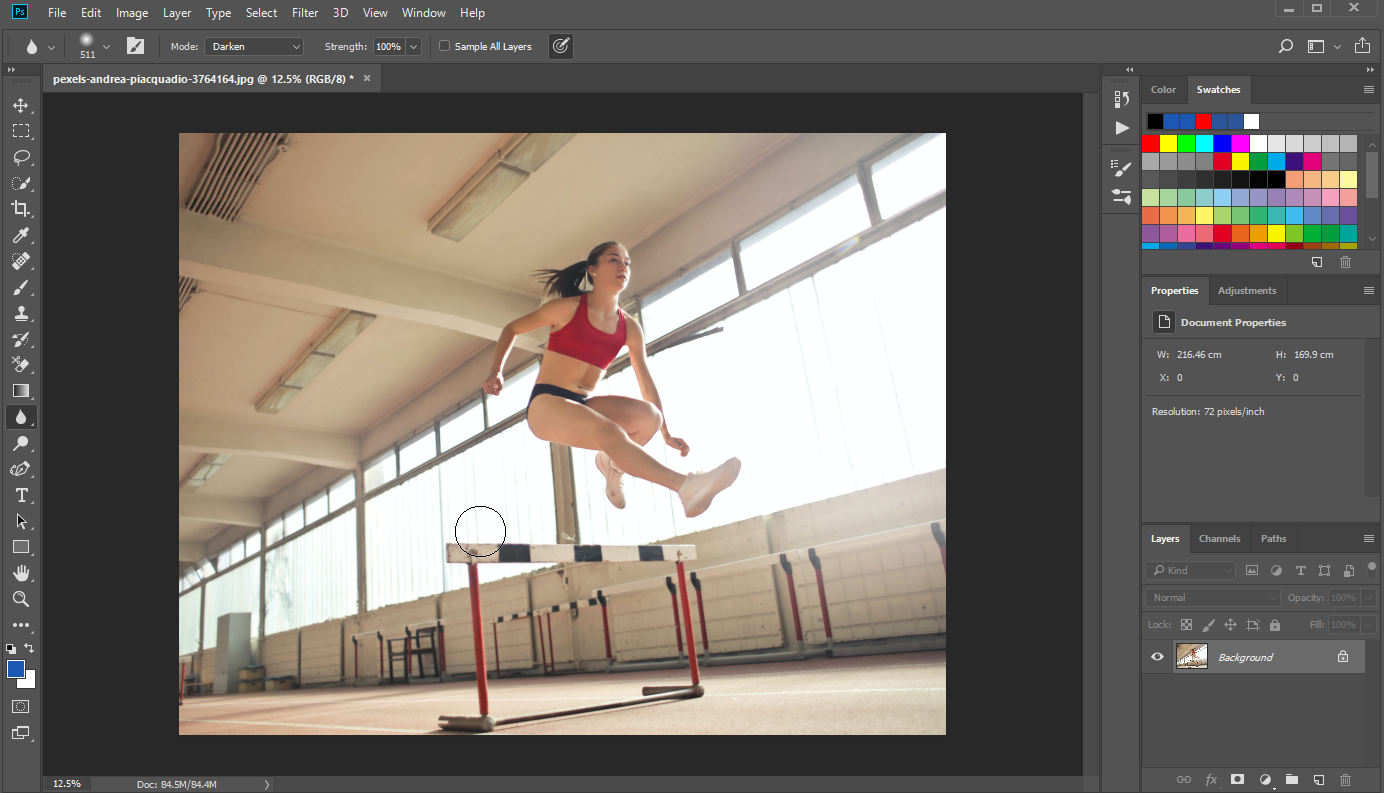
- Step 2. Then, move your cursor around the background area you want to render blurry. Note that the changes made by Photoshop blur tool are so subtle that you may not notice them, and you can blur an area repeatedly to get a satisfying outcome.
Method 2. Use Box Blur or Gaussian Blur to Blur Background
In addition to directly use Blur tool to blur background in Photoshop, you can also make use of some blur filters to achieve the goal.
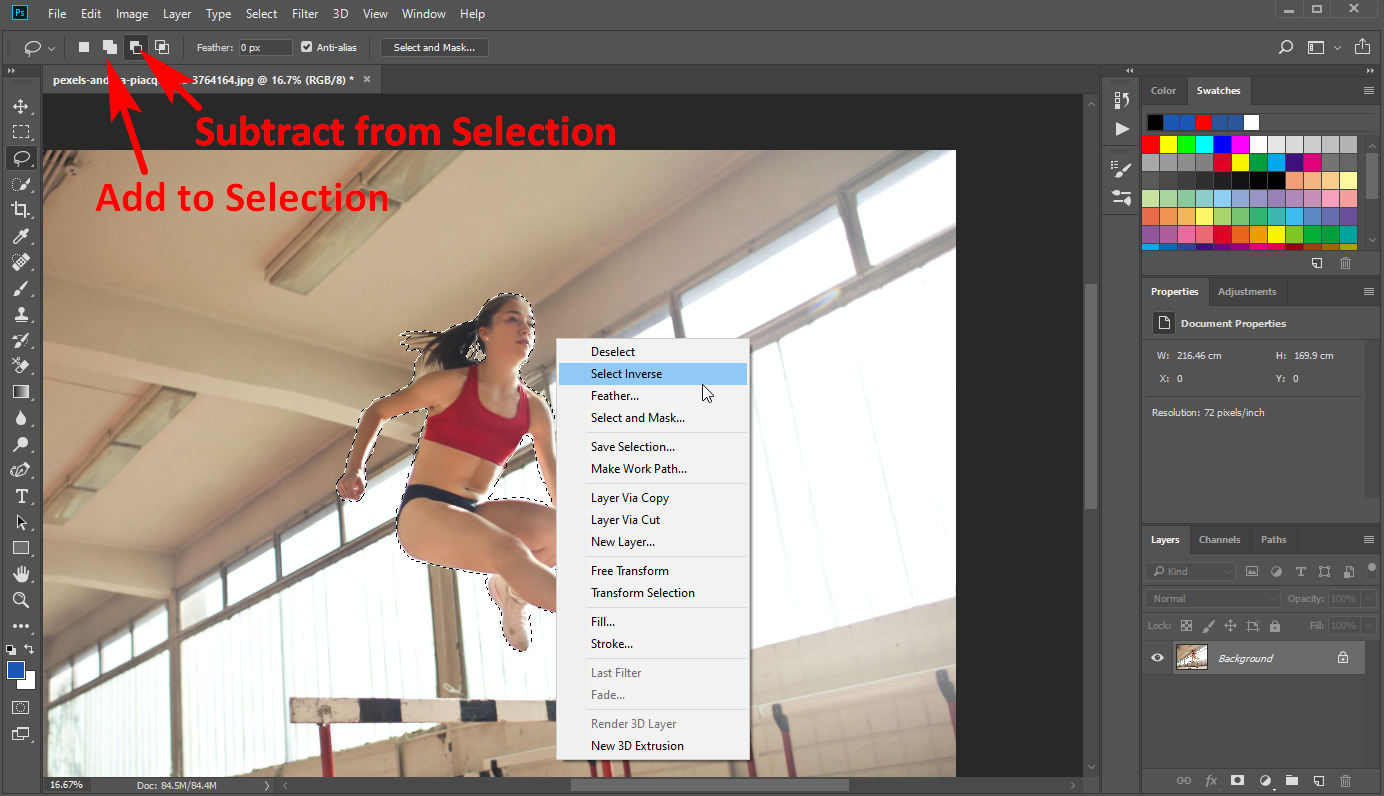
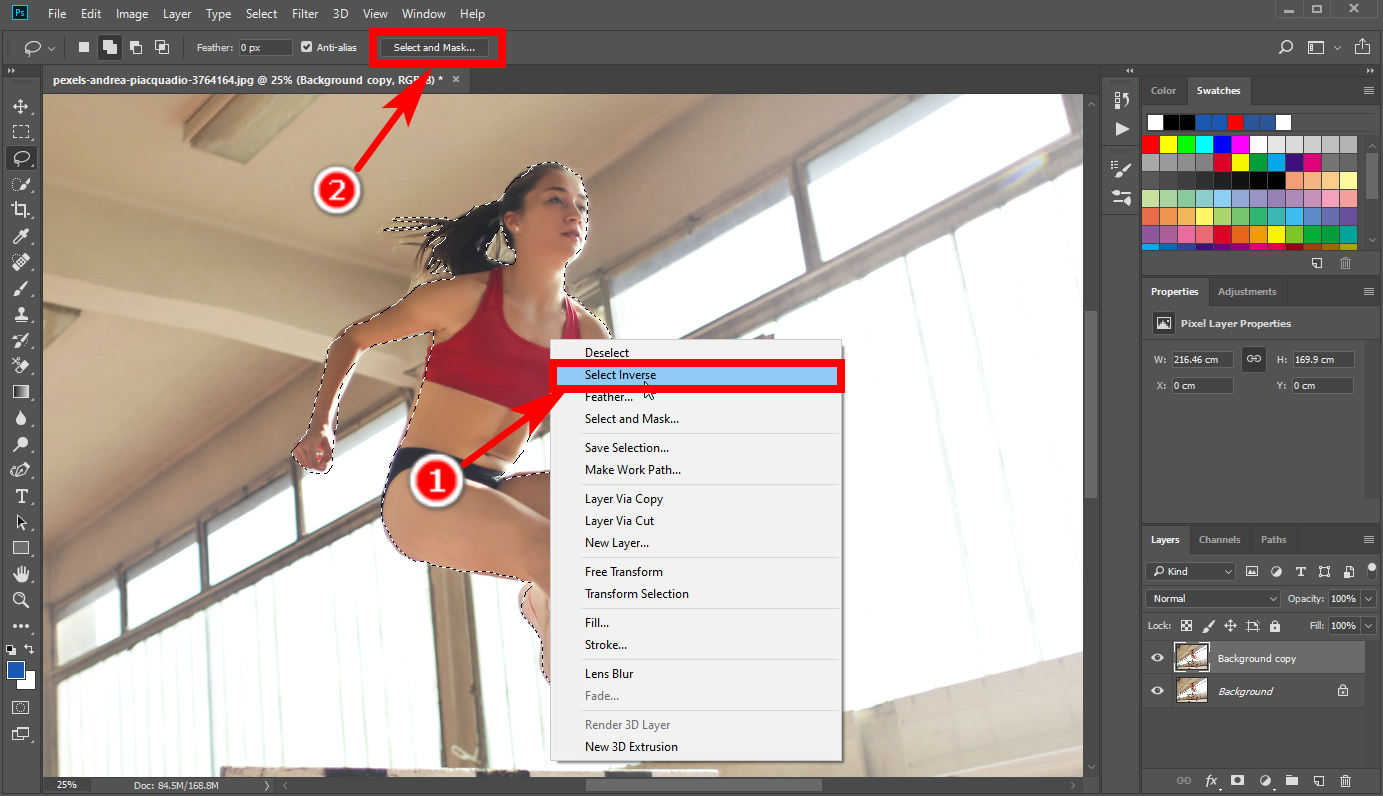
- Step 1. At first, you need to select the background. Photoshop has different tools for selection and I will recommend Lasso tool here. Click on the Lasso tool on the left tools panel and then draw an outline of the object. You can refine your selection with “Add to Selection” or “Subtract from Selection” tool on the upper panel. Then, right-click and choose “Select Inverse” to select the background.
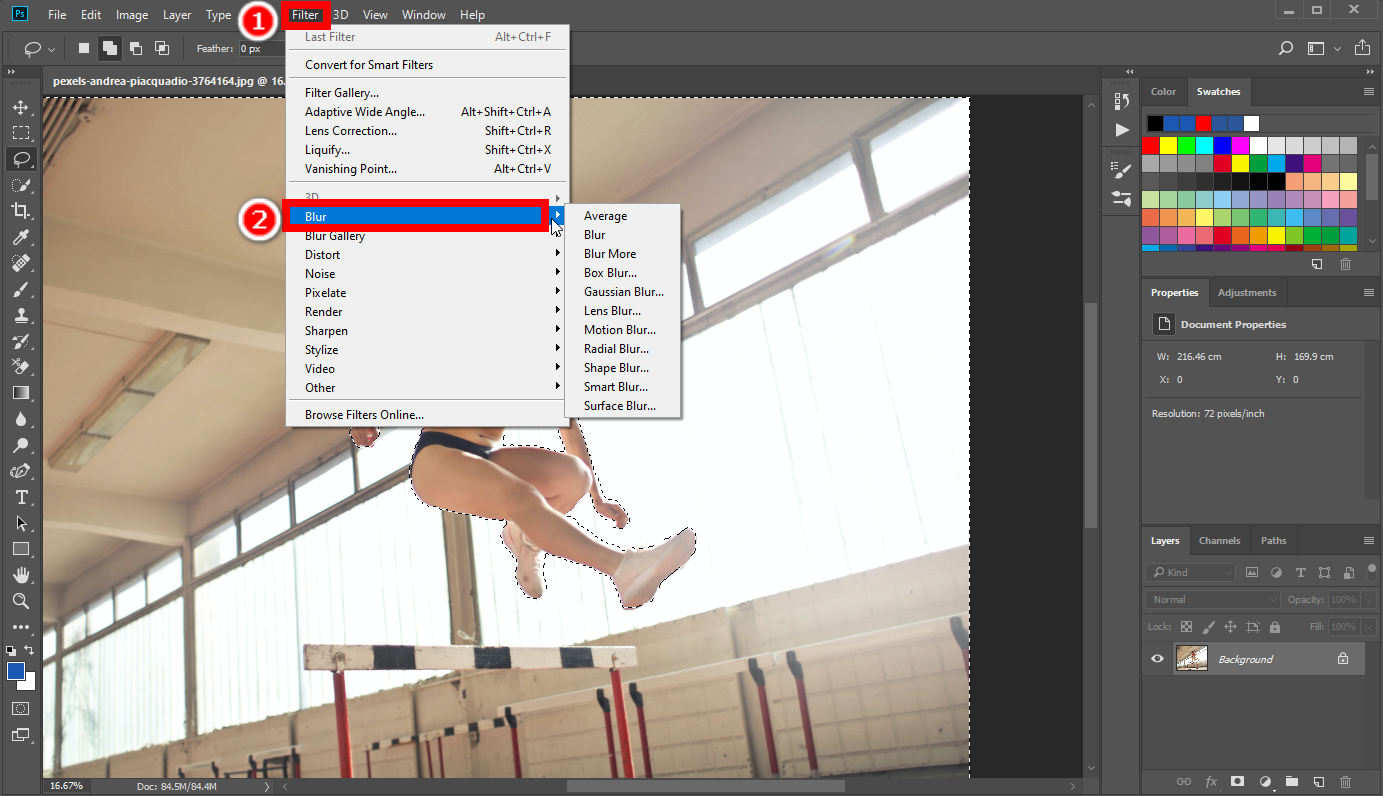
- Step 2. Then, click on “Filters” > “Blur,” and you will see a menu of various blur filters, among which most people will often use “Box Blur” or “Gaussian Blur” to blur image in Photoshop.
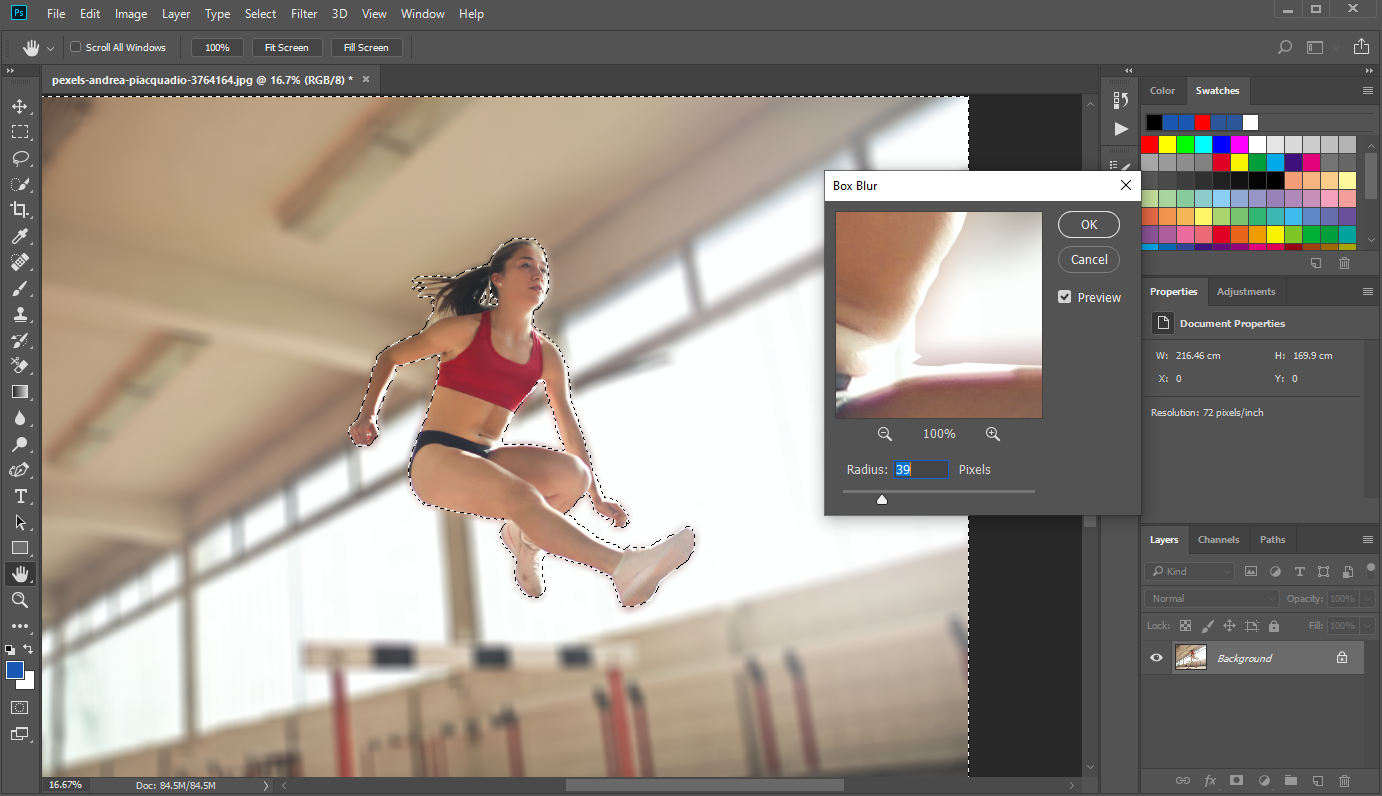
- Step 3. If you choose Box blur, the result is shown below.
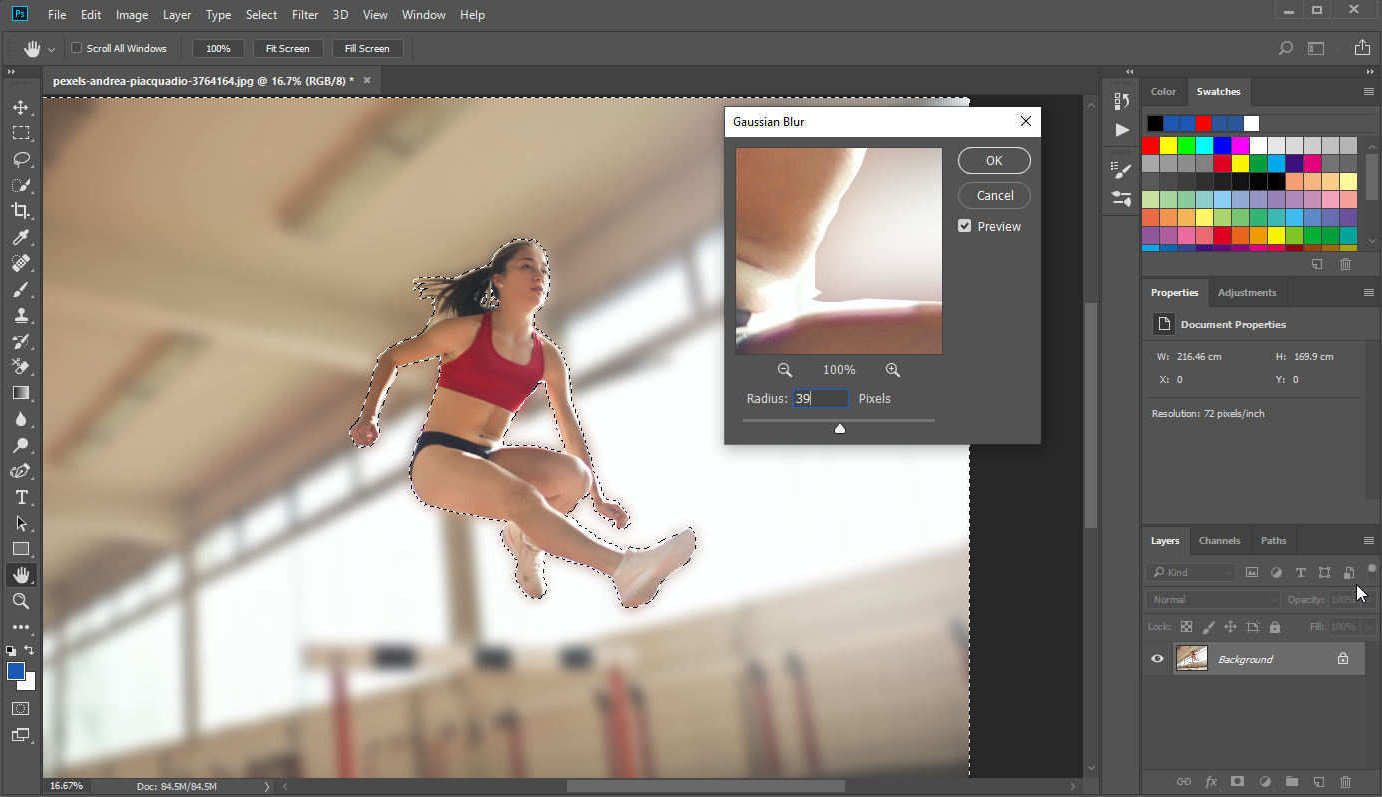
- Step 4. The Gaussian Blur looks like viewing something through a translucent screen.
Difference Between Box Blur and Gaussian Blur
Blurring is to mix a pixel with colors of the neighboring area with a special algorithm. The Box Blur mixes a pixel with the average color of the neighboring pixels, while the Gaussian Blur utilize the so-called Gaussian function that gives different weighting to pixels according to their distance from a certain pixel.
Part 2. More Blur Effects in Photoshop
In addition to Box Blur and Gaussian Blur, there are other powerful blur filters in Photoshop. We can use them to apply diverse blur effects to an image. Go on reading for further descriptions of them.
Average
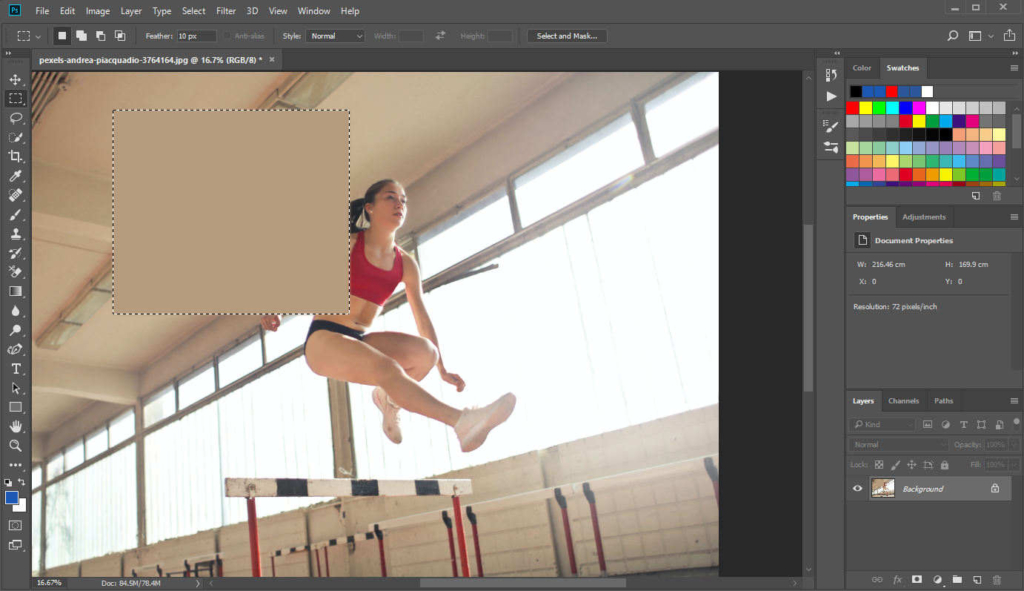
If you choose “Average,” Photoshop will try to calculate an average color of all colors in an area and fill the whole area with that average color.
Lens Blur
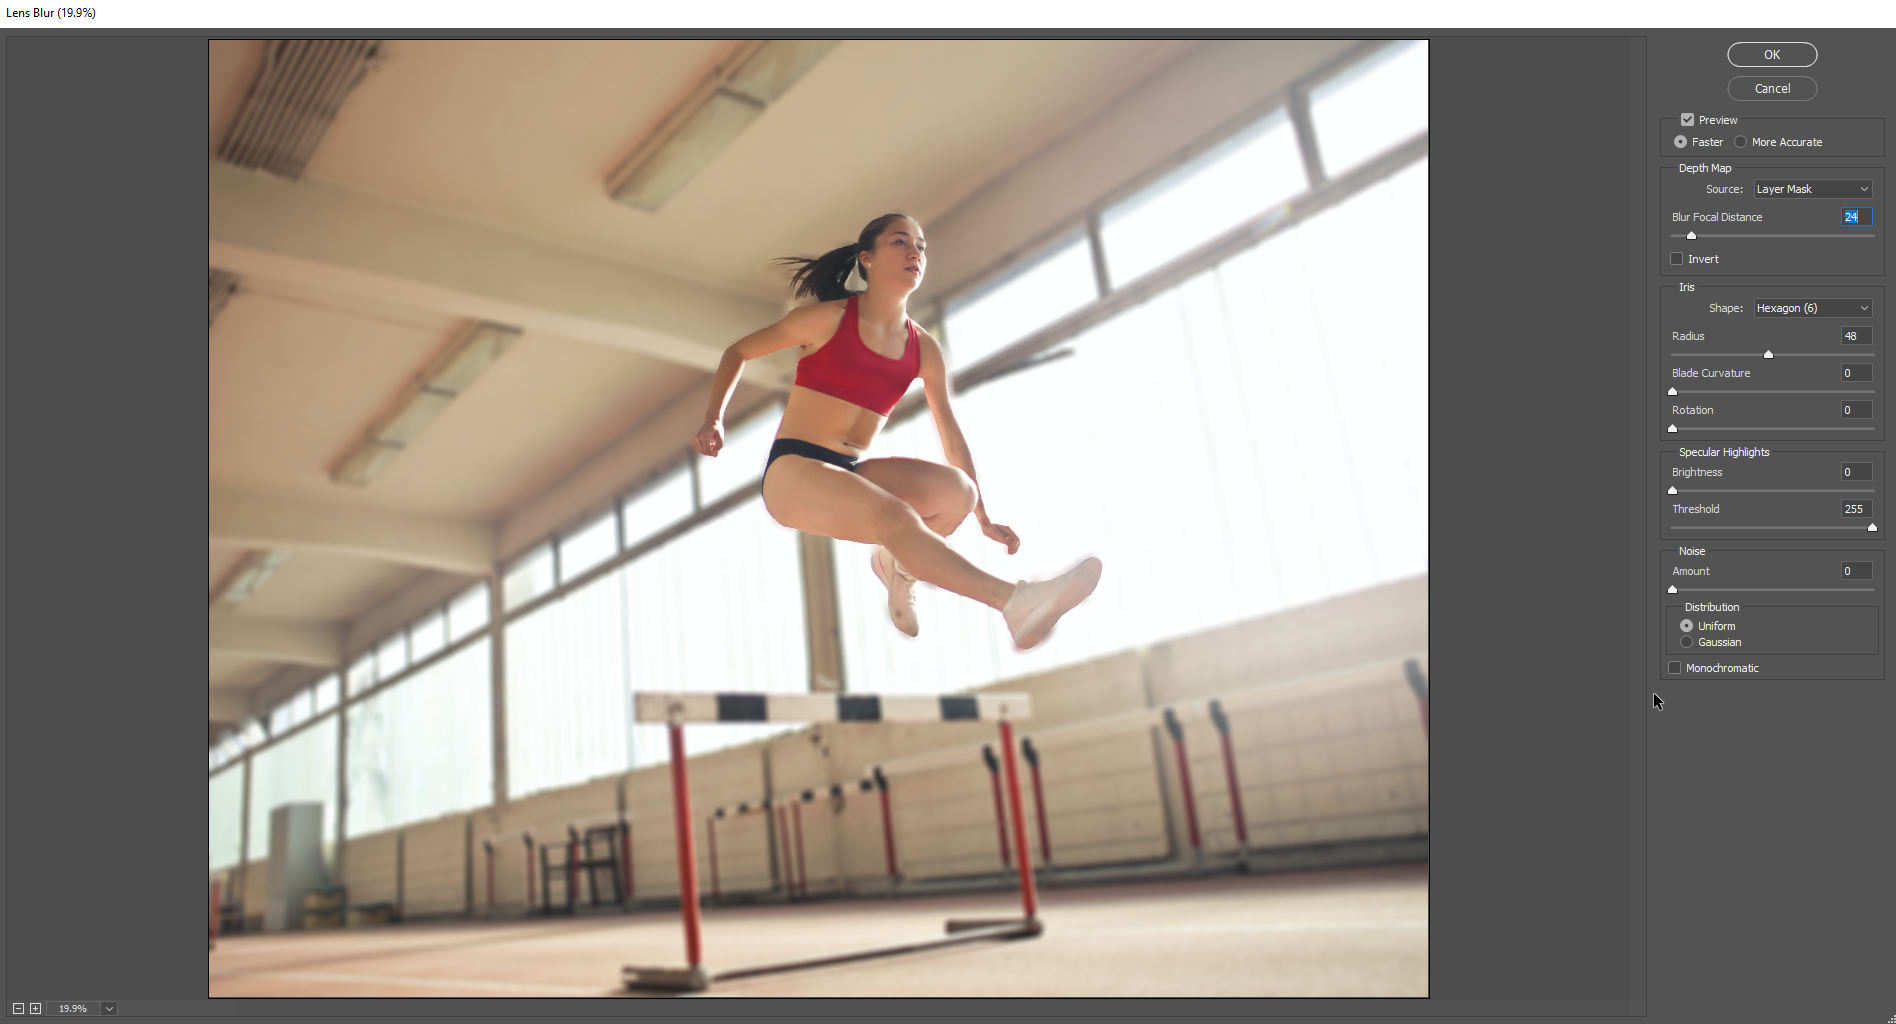
With Lens Blur you can add some depth of field to a picture, which means a sense of isolation of background from object. It requires some steps to apply this blur filter.
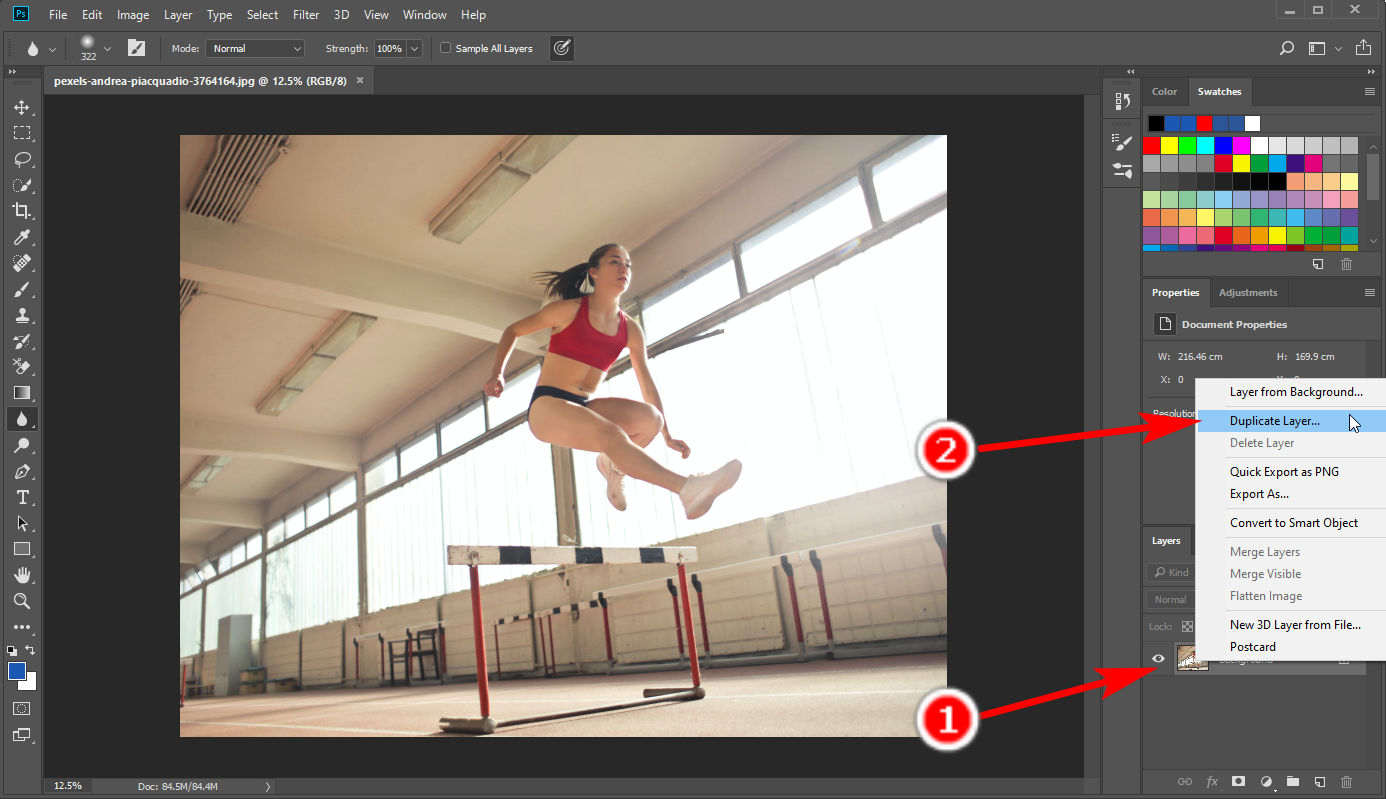
- Step 1. First, go to the Layers panel, right-click on the original layer and “Duplicate Layer” to create a copy of it.
- Step 2. In the new layer, select the object and the right-click to “Select Inverse” to make a selection of the background. Then, click on “Select and Mask” on the upper panel.
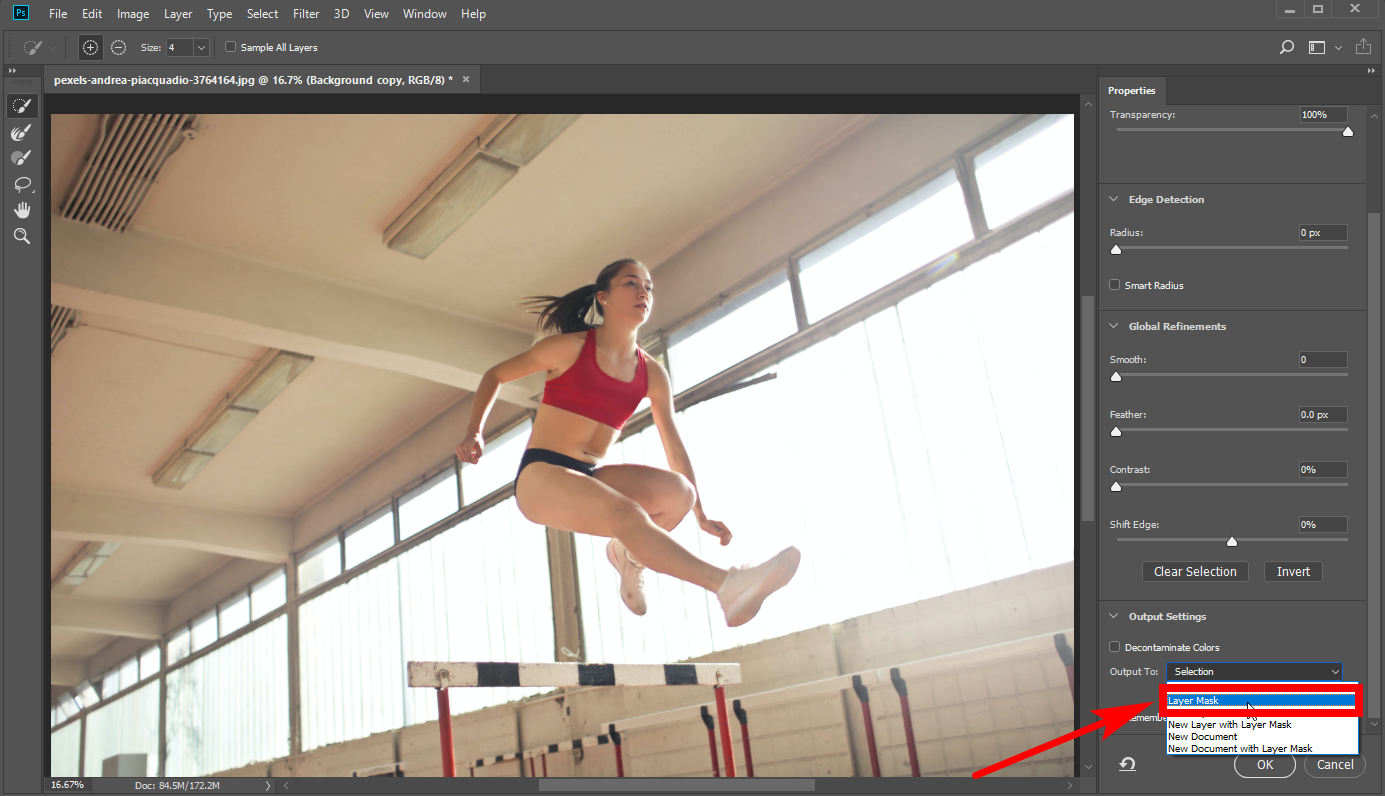
- Step 3. Then, in the Select and Mask interface, change the “Output To” option to “Layer Mask.”
- Step 4. Finally, click on the layer (not the mask) and select “Filter” > “Blur” > “Lens Blur.” A window for editing will pop out. Modify the features of the blur here to get a satisfying result. It is a useful tool for you to blur background in Photoshop.
Motion Blur
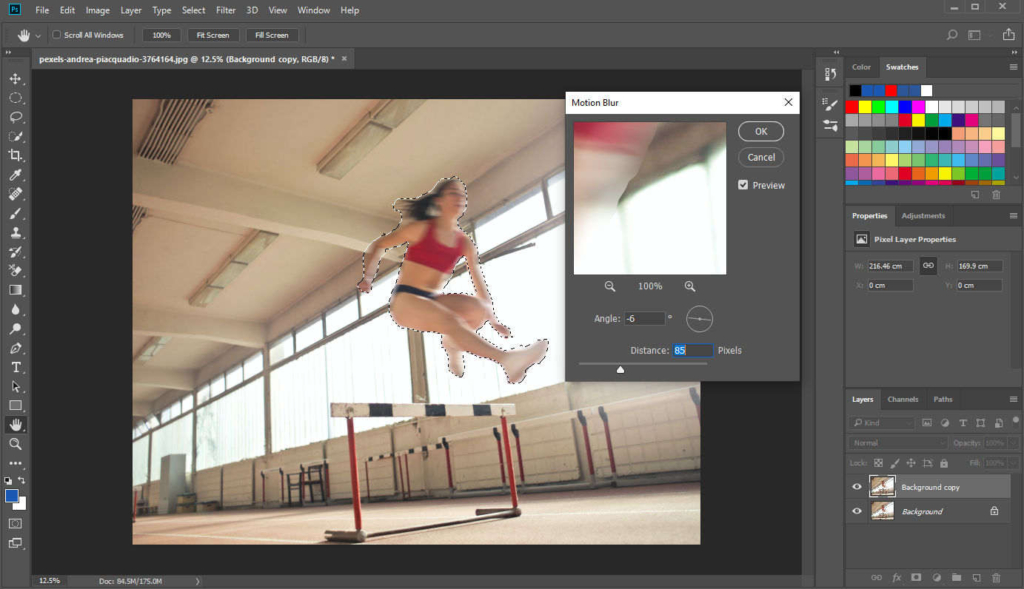
If you want to give sense of movement to an object, Motion Blur is the choice, which can add a directional blurring effect to an object to make it seem to be moving. Make a selection of the object and then click on “Filter” > “Blur” > “Motion Blur” to get the result.
Radial Blur
Radial Blur is used to distort and blur a circular area. There are two blur methods in Radial blur: Spin (blurring along the concentric circular lines) or Zoom (burring along the radial lines).
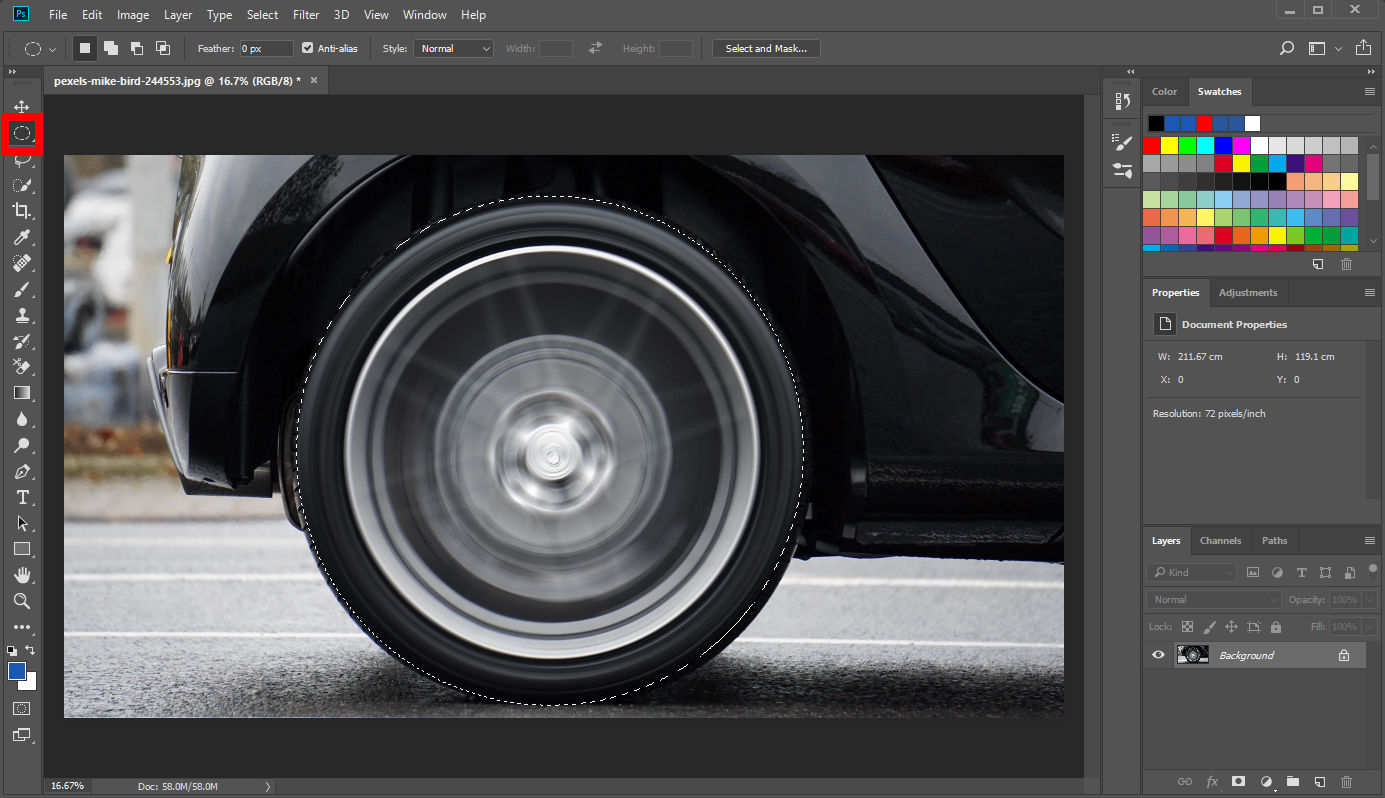
If you want to add a sense of rotation to a circular object, select it with an Elliptical Marquee tool and blur it with Spin method of Radial Blur.
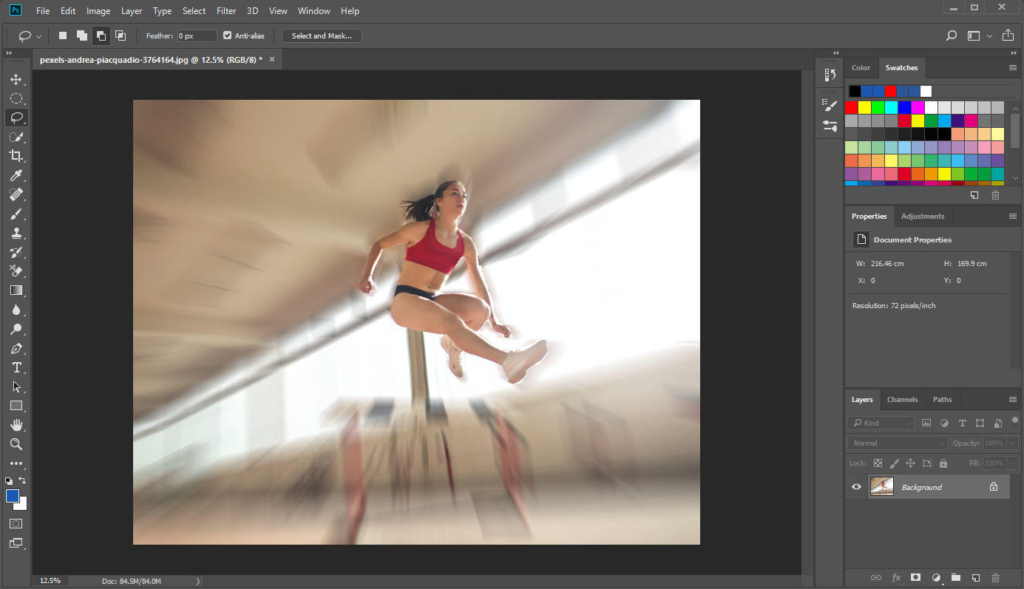
Or you can add a Zoom blur filter to the background of a photo to make the object more visually striking.
Shape Blur
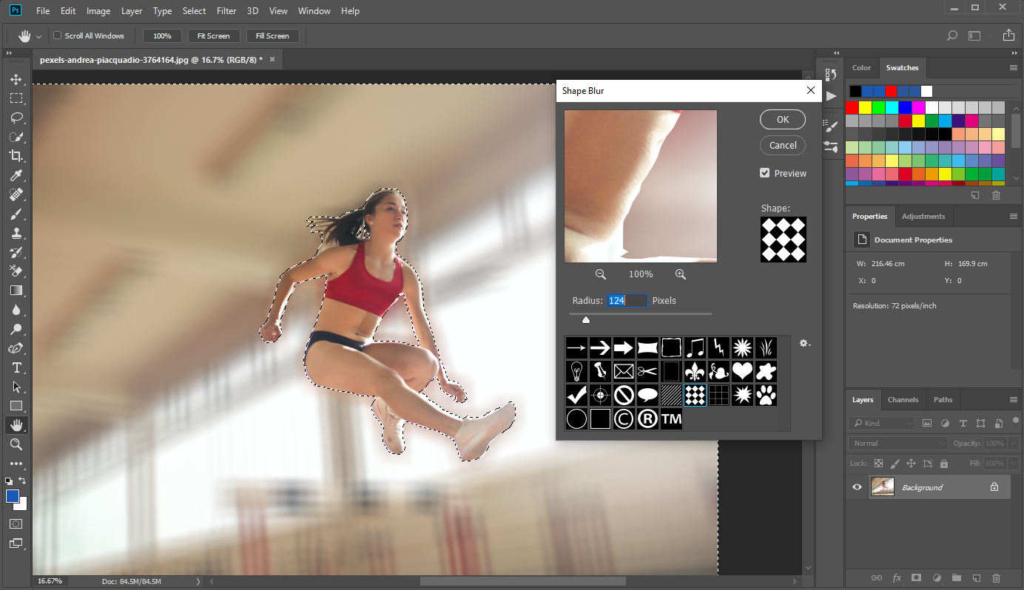
It makes use of various black and white shapes as the convolution matrix (or “kernel”) to produce convoluted blur effects. The shape will add specific patterns to the blurred area, producing diverse blur effects. It looks like viewing something through an obscure glass with special pattern.
Below is shown the blur effect of the chessboard shape.
Smart Blur
It is used to blur image in photoshop precisely by utilizing meticulous accuracy based on dissimilar pixels.
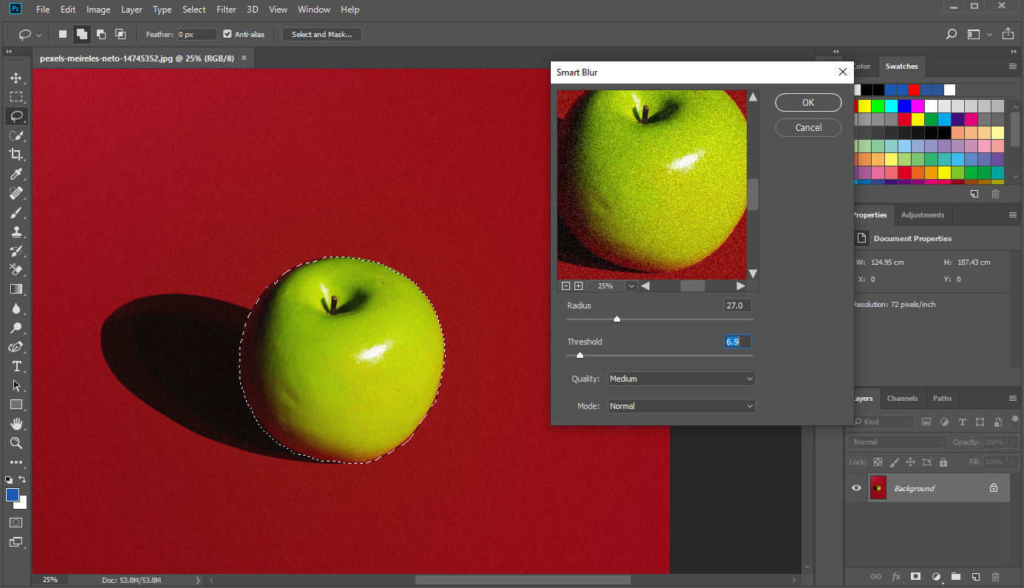
You can alter “Radius,” “Threshold” and “Mode” or “Blur Quality” to control the effect.
Change “Radius” to decide the area size and thus the degree of blurring. Change “Threshold” to control how dissimilar the pixels should be blurred.
As for the “Mode,” there are three options, Normal, Edge Only and Overlay Edge. “Normal” generates literally normal blurring. “Edge Only” marks the edges of color transitions with white color and the background with black color, while “Overlay Edge” only applies the white color to the edge.
Surface Blur
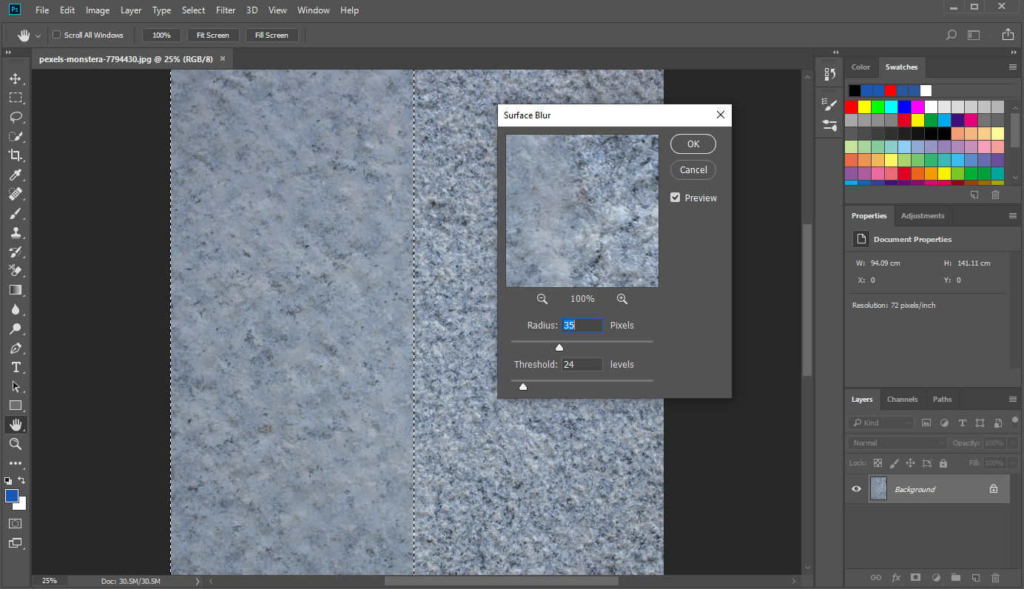
Surface Blur is often used to reduce the noise or graininess of a picture to make a coarse surface smoother. Below is an example of a picture of marble with rough texture. Select an area you want to make smoother, click on “Filter” > “Blur” “Surface Blur” and a pop-up window will appear to alter the effect. “Radius” determines the area size and a higher figure of it means the blurrier effect. “Threshold” regulates the tonal values of the adjacent pixels and a higher figure means that the colors in the blur area will be more similar to the average color.
Conclusion
We have shown you how to blur image in Photoshop with its various powerful blur tools. Thus, you can render your picture more vivid or attractive, which is helpful because, you know, it is better to have good pictures for different scenarios nowadays.
You should note that each Photoshop blur tool are different in effect from others. Choose the one that meets your need the best, or you can use multiple blur filters simultaneously.
FAQs
How do I blur background in Photoshop?
You can use the Blur tool on the left tool panel and draw a blurry area with the blur brush. Otherwise, click on Filter, Blur and choose a blur filter you like from various blur filters.
How to make background blurry?
Open a picture in Photoshop, and then, make a selection of the background with Lasso tool or Quick Selection tool. You can select the object first and right-click to Select Inverse to choose the background.Then, click on Filter, Blur, Gaussian Blur to have a photo with blurry background.


